Dec 14, 2011

Avoid plug-in when call comes from JavaScript

Though, it’s not new for most of the CRM developers, I thought of writing about caller origin since I solve one of my recent scenarios with this approach. This is practically very important.

My scenario was to do a calculation in creation of quote product. Speciality in this case is that, quote products were to be added as usual through the form and also through a tool (i.e. experlogix) which uses the CRM service. Obviously I have to have a plug-in. Then I am also told that user can override some calculations when creating quote products through form and put some arbitrary values. Then I came to a point that plug-in shouldn’t work when creation happen through a native CRM form. This is the place I used the caller Origin before executing the plug-in steps. Below code did the trick for me.

if (context.CallerOrigin.GetType() == typeof(Microsoft.Crm.Sdk.WebServiceApiOrigin))
{
  //plug-in steps
}

Below are the three caller origin types we can use to filters an execution.

ApplicationOrigin   - Call from Application
AsyncServiceOrigin  - Call from Async service (identify actions occur through workflows)
WebServiceApiOrigin - Call from Web Service

Nov 24, 2011

Defining DisplayRule for buttons

I have shown in my previous post how to enable/disable a ribbon button according to defined criteria. Assume that we need to make it visible/invisible depending on the same rule. This is also possible with a little change of XML. Get defined our own display rule instead of enable rule. Define and call under Displayrules tag instead of Enablerules tag. Please check below code. (Please refer previous post for relevant CustomActions tag entry.)
<CommandDefinition Id="Cmd_CUSTOM_CompanyFunction">
  <EnableRules>
    <EnableRule Id="Mscrm.AvailableOnForm" />
    <EnableRule Id="Mscrm.CanSavePrimary" />
  </EnableRules>
  <DisplayRules>
    <DisplayRule Id="DR_CUSTOM_CompanyCustomer" />
  </DisplayRules>
  <Actions />
</CommandDefinition>

<RuleDefinitions>
  <TabDisplayRules />
  <DisplayRules>
    <DisplayRule Id="DR_CUSTOM_CompanyCustomer">
      <ValueRule Default="false"
                 Field="new_typeofcustomer"
                 InvertResult="false"
                 Value="100000001"/>
    </DisplayRule>
  </DisplayRules>
  <EnableRules>
    ----------
  </EnableRules>
</RuleDefinitions>

Defining EnableRule for buttons

We have discussed how to add custom buttons to ribbons in a recent post. We have used standard Enablerules for them. Enablerules are to define criteria when to enable/disable our button. If we discuss a real time scenario, I need to enable a button in account form ribbon when account is a company. Here, account can be an individual or a company, which decides by the value of one option list.  We will first see the CustomActions and CommandDefinitions entries, which are familiar already.

<CustomActions>
  <CustomAction Id="CA_CUSTOM_CompanyFunction" 
                Location="Mscrm.Form.account.MainTab.Save.Controls._children" 
                Sequence="35">
    <CommandUIDefinition>
      <Button Id="B_CUSTOM_CompanyFunction" 
       Command="Cmd_CUSTOM_CompanyFunction" 
       LabelText="Company Matters" 
       ToolTipTitle="Company related Matters" 
       ToolTipDescription="This calculate and gives you the company related information" 
       TemplateAlias="o1" 
       Image16by16="/_imgs/SFA/calculate_16.png" 
       Image32by32="/_imgs/ribbon/calculate32.png"/>
    </CommandUIDefinition>
  </CustomAction>
</CustomActions>

<CommandDefinitions>
  <CommandDefinition Id="Cmd_CUSTOM_CompanyFunction">
    <EnableRules>
      <EnableRule Id="ER_CUSTOM_CompanyCustomer" />
    </EnableRules>
    <DisplayRules>
      <DisplayRule Id="Mscrm.CanSaveAndClosePrimaryEntityType" />
    </DisplayRules>
    <Actions />
  </CommandDefinition>
</CommandDefinitions>

Now, take a close look at the enable rule ER_CUSTOM_CompanyCustomer  which is defined by me. This is to be defined with our criteria. Interesting part of ribbon is that I can define those in a special section called <RuleDefinitions>. Under this tag, we can see two sections to define two kinds of rules. Namely Display rules and Enable rules. See carefully, how I have defined my enable rule there.

<RuleDefinitions>
  <TabDisplayRules />
  <DisplayRules>
    ----------
  </DisplayRules>
  <EnableRules>
    <EnableRule Id="ER_CUSTOM_CompanyCustomer">
      <ValueRule Default="false"  
                 Field="new_typeofcustomer" 
                 InvertResult="false" 
                 Value="100000001"/>
    </EnableRule>
  </EnableRules>
</RuleDefinitions>

Here mew_typeofcustomer is the name of optionlist and 100000001 Is the value of company.


We didn’t have this kind of controlling power in CRM 4.0. This is cool.
(Read about Displayrules here.)

Nov 22, 2011

State (Statecode and statuscode) change through a JavaScript

We can find a nice code on status changes here. I tried to make it more generalised as below and it works for me.

SetStateRequest = function (_entityname, entityid, _state, _status)
{
    var requestMain = ""
    requestMain += "<s:Envelope xmlns:s=\"http://schemas.xmlsoap.org/soap/envelope/\">";
    requestMain += "  <s:Body>";
    requestMain += "    <Execute xmlns=\"http://schemas.microsoft.com/xrm/2011/Contracts/Services\" xmlns:i=\"http://www.w3.org/2001/XMLSchema-instance\">";
    requestMain += "      <request i:type=\"b:SetStateRequest\" xmlns:a=\"http://schemas.microsoft.com/xrm/2011/Contracts\" xmlns:b=\"http://schemas.microsoft.com/crm/2011/Contracts\">";
    requestMain += "        <a:Parameters xmlns:c=\"http://schemas.datacontract.org/2004/07/System.Collections.Generic\">";
    requestMain += "          <a:KeyValuePairOfstringanyType>";
    requestMain += "            <c:key>EntityMoniker</c:key>";
    requestMain += "            <c:value i:type=\"a:EntityReference\">";
    requestMain += "              <a:Id>" + entityid + "</a:Id>";
    requestMain += "              <a:LogicalName>" + _entityname + "</a:LogicalName>";
    requestMain += "              <a:Name i:nil=\"true\" />";
    requestMain += "            </c:value>";
    requestMain += "          </a:KeyValuePairOfstringanyType>";
    requestMain += "          <a:KeyValuePairOfstringanyType>";
    requestMain += "            <c:key>State</c:key>";
    requestMain += "            <c:value i:type=\"a:OptionSetValue\">";
    requestMain += "              <a:Value>" + _state + "</a:Value>";
    requestMain += "            </c:value>";
    requestMain += "          </a:KeyValuePairOfstringanyType>";
    requestMain += "          <a:KeyValuePairOfstringanyType>";
    requestMain += "            <c:key>Status</c:key>";
    requestMain += "            <c:value i:type=\"a:OptionSetValue\">";
    requestMain += "              <a:Value>" + _status + "</a:Value>";
    requestMain += "            </c:value>";
    requestMain += "          </a:KeyValuePairOfstringanyType>";
    requestMain += "        </a:Parameters>";
    requestMain += "        <a:RequestId i:nil=\"true\" />";
    requestMain += "        <a:RequestName>SetState</a:RequestName>";
    requestMain += "      </request>";
    requestMain += "    </Execute>";
    requestMain += "  </s:Body>";
    requestMain += "</s:Envelope>";
    var req = new XMLHttpRequest();
    req.open("POST", _getServerUrl(), false)
    // Responses will return XML. It isn't possible to return JSON.
    req.setRequestHeader("Accept", "application/xml, text/xml, */*");
    req.setRequestHeader("Content-Type", "text/xml; charset=utf-8");
    req.setRequestHeader("SOAPAction", "http://schemas.microsoft.com/xrm/2011/Contracts/Services/IOrganizationService/Execute");
    var successCallback = null;
    var errorCallback = null;
    req.onreadystatechange = function () { SetStateResponse(req, successCallback, errorCallback); };
    req.send(requestMain);
}

SetStateResponse = function (req, successCallback, errorCallback)
{
    if (req.readyState == 4)
    {
        if (req.status == 200)
        {
            if (successCallback != null)
            { successCallback(); }
        }
        else
        {
            errorCallback(SDK.SAMPLES._getError(req.responseXML));
        }
    }
}

Also need below two supportive methods.

_getServerUrl = function ()
{
    var OrgServicePath = "/XRMServices/2011/Organization.svc/web";
    var serverUrl = "";
    if (typeof GetGlobalContext == "function")
    {
        var context = GetGlobalContext();
        serverUrl = context.getServerUrl();
    }
    else
    {
        if (typeof Xrm.Page.context == "object")
        {
            serverUrl = Xrm.Page.context.getServerUrl();
        }
        else
        { throw new Error("Unable to access the server URL"); }
    }
    if (serverUrl.match(/\/$/))
    {
        serverUrl = serverUrl.substring(0, serverUrl.length - 1);
    }
    return serverUrl + OrgServicePath;
}

_getError = function (faultXml)
{
    var errorMessage = "Unknown Error (Unable to parse the fault)";
    if (typeof faultXml == "object")
    {
        try
        {
            var bodyNode = faultXml.firstChild.firstChild;
            //Retrieve the fault node
            for (var i = 0; i < bodyNode.childNodes.length; i++)
            {
                var node = bodyNode.childNodes[i];
                if ("s:Fault" == node.nodeName)
                {
                    for (var j = 0; j < node.childNodes.length; j++)
                    {
                        var faultStringNode = node.childNodes[j];
                        if ("faultstring" == faultStringNode.nodeName)
                        {
                            errorMessage = faultStringNode.text;
                            break;
                        }
                    }
                    break;
                }
            }
        }
        catch (e) { };
    }
    return new Error(errorMessage);
}


Few examples I tried;
Deactivating an account -> SetStateRequest("account", _accountid, 1, 2)
Changing a Salesorder to submitted state -> SetStateRequest("salesorder", _salesorderid, 1, 3)
Disqualifying a lead with reason "No longer interested" -> SetStateRequest("lead", _leadid, 2, 6)

Anyway, still I don’t know whether this works for all the entities... but so far so good :-)

Nov 21, 2011

Ascentium CrmService in CRM 2011

As I mentioned earlier Ascentium CrmService is a handy way of doing Data operations through JavaScrips in CRM. Is this still applicable with CRM 2011?

Answer is yes. We managed to do the operations such as Create, Update & etc. There is a tricky part when starting, because it’s quite difficult to have a web resource for CrmService.js You can’t just open the “Text Editor” and paste the code. Instead, you will need to upload the code through “upload file” in web resource window.


Hope this will help you too..

Nov 9, 2011

Custom recalculation button for opportunity

Scenario: It is required to calculate the cost in opportunity. Usually, opportunity consists of Recalculation button to calculate few values, but not cost as I need. First I tried to find a way to fire my own JavaScript to do that with the same button, but I learned it is not a recommended attempt. So now I am trying to implement my own Button to do all the calculations (my way) and hide the existing calculation buttons.

To add/ Hide buttons I need to modify the ribbon. In order to modify the ribbon it is needed to import the customization of particular entity. For clarity I will mention below steps;

Create solution and add only the entity we need to modify the ribbon.
  1. Export it (Don’t add any other depending objects/ export as unmanaged solution)
  2. Unzip the file (it will give three XML files)
  3. Modify the customizations.xml file accordingly (which we will discuss)
  4. Zip the files again
  5. Import the file and publish
To play around with Ribbon, there are some resources to be referred. SDK has provided a XML file for each entity in sdk\resources\exportedribbonxml folder. For my example with opportunity, I can open opportunityribbon.xml. So practically, we need to open two XML files when we need to modify a ribbon.

  1. Costomization.xml (TO MODIFY)
  2. <entityname>ribbon.xml (TO REFER)
Reference file contains all the information about existing buttons, locations and their characteristics such as abilities and visibility. First we will hide the existing Recalculate buttons. When I simply search the reference file I found two button Ids for this (Mscrm.Form.opportunity.Recalculate, Mscrm.HomepageGrid.opportunity.Recalculate).

Buttons can be placed in three main ways in ribbon.

Mscrm.Form.<entityname> – button appears when form is opened for selected record.
Mscrm.HomepageGrid.<entityname> – button appears when grid is shown (multiple records)
Mscrm.SubGrid.<entityname> - Button appears when records appear within a subgid of some other entity

Now adding below entries within the <CustomActions> tag will do the hiding of both Recalculate buttons.

<HideCustomAction Location="Mscrm.Form.opportunity.Recalculate" 
   HideActionId="Mscrm.Form.opportunity.Recalculate.HideAction" />
<HideCustomAction Location="Mscrm.HomepageGrid.opportunity.Recalculate" 
   HideActionId="Mscrm.HomepageGrid.opportunity.Recalculate.HideAction" />

Now I am trying to add my own button with instructions to fire my javascript method. Add below entry within <CustomActions> and <CommandDefinitions> tags respectively.

<CustomAction Id="CA_CUSTOM_Recalculation" Location="Mscrm.Form.opportunity.MainTab.Actions.Controls._children" Sequence="8">
  <CommandUIDefinition>
    <Button Id="B_CUSTOM_Recalculation" 
            Command="Cmd_CUSTOM_Recalculation" 
            LabelText="Recalculate Job" 
            ToolTipTitle="Recalculate Totals, Costs and Margin" 
            ToolTipDescription="This recalculates Job Price, Job Cost and Job Margin" 
            TemplateAlias="o1" 
            Image16by16="/_imgs/SFA/Recalculate_16.png" 
            Image32by32="/_imgs/ribbon/recalculateopportunity32.png"/>
  </CommandUIDefinition>
</CustomAction>

<CommandDefinition Id="Cmd_CUSTOM_Recalculation">
  <EnableRules>
    <EnableRule Id="Mscrm.CanWritePrimary" />
    <EnableRule Id="Mscrm.OpportunityIsOpen" />
  </EnableRules>
  <DisplayRules>
    <DisplayRule Id="Mscrm.CanWriteOpportunity" />
  </DisplayRules>
  <Actions>
    <JavaScriptFunction Library="$webresource:new_recalculations.js" 
                        FunctionName="JobCalculationSinglejob">
    </JavaScriptFunction>
  </Actions>
</CommandDefinition>


Here CustomAction Id and Button Id are a two unique values I gave to my Custom Action and Button respectively. If you look carefully, it’s noticeable that I have given a command name and use that when I define the command later on. Though location value is bit tricky, I have checked the reference file and found the location of the existing recalculate buttons for that. “_children” postfix is to tell that button should come under that. Sequence number is a number to arrange the buttons with the existing buttons. Other buttons in same location were having numbers 5, 6 and 7 and I wanted to add my one at the end, which I put 8.

Command definition is used to define the behaviour of my button and it’s obvious to see how it calls a method within the JavaScript which has been saved as a webresource. Also I have done a cunning work here. Since I am going to perform a calculation, I copied (from reference file) the enablerules and displayrules from the rules of existing recalculation button. So my button will behave the same way.

Now I am free to do calculation within my Javascript method with my own rules!

Nov 7, 2011

Referring JavaScript files

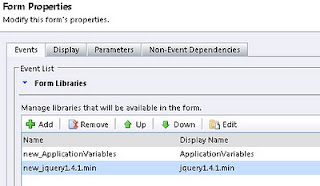
Referring the JavaScript files in CRM 2011 is pretty straight forward. You have been given a room for doing it in customization area as below.
So this is easy. Once a file is added to this space, all the methods in it become available to use.


Anyway, when you call a method from the Ribbon, it’s not the case. You can simply mention a file and method as below. In this case our method is called CalculateCost(). We can now call only the functions in this file only.

<Actions>
  <JavaScriptFunction Library="$webresource:new_Cal.js" FunctionName="CalculateCost">
  </JavaScriptFunction>
</Actions>

If we need to access some other JavaScript method in some other file (a web resource), how we are going to achieve it? Well, I managed to do it this way. Suppose, we need to access another method from CalculateCost which is in another file called new_Utilities. This is how I am going to call them.

function InjectScript(scriptFile)
{
  var netRequest = new ActiveXObject("Msxml2.XMLHTTP");
  netRequest.open("GET", scriptFile, false);
  netRequest.send(null);
  return netRequest.responseText;
}

function CalculateCost()
{
  eval(InjectScript('../WebResources/new_Utilities.js'));

  //now all the methods in new_Utilities can be called 
}

Hope this will help.

Nov 1, 2011

Fire it in Form close

Sometime we need to do something when a form is being closed without saving. We are given provision to execute a script in loading and saving in both CRM 4.0 and 2011, but not for closing a form. Below is the section that we add usual JavaScript functions for forms events in CRM 2011;


This is a simple script that catch the event and do something for you..

window.onbeforeunload = function() 
{
    //code goes here
}

Oct 31, 2011

I miss you DeletionStateCode!

While I was trying to study bits and pieces of CRM 2011, I noticed that DeletionStateCode is not more available in entities. This is a signal that I need to be careful when deleting the records :-)

If I delete an important record, I might not be able to recover the record, because its being deleted in the real time.. I might miss "DeletionStateCode" badly!

Oct 19, 2011

A misleading behaviour of address fields lengths

I recently found some tricky fields in CRM 4.0 that could make developer’s life bad. I found this in Lead entity, but this issue could be applicable for some other entities. Anyway this has nothing to do with custom entities.

If you see the address fields of Lead, you will be able to find some fields such as Address1_line1, Address1_city, Address2_line1, Address2_City2 and etc. If you go to customization area you can increase the maximum length of those fields. Unfortunately, publishing too is possible.


Since it is publishable one can think, everything is fine, but still actually field length is not changed. Tricky part is you may be able to create records sometimes, but when you try to create record with long data for those fields you will get an error.


Anyway, reason for this issue is, CRM is keeping those data in a separate table, which is not being modified through usual customization process. (I guess) Check the way, actual address fields of Lead are kept in a different table. It shows the actual maximum lengths you can go for. This is bit misleading since you are allowed to publish the entity after changing those fields.


I wonder if anyone has tried changing those database fields outside the CRM.

Oct 5, 2011

Sep 14, 2011

Convert entity relationship type with data. (n:1 to n:n)

You are always recommended to determine all your relationships in between the entities prior to implementation of CRM. Anyhow, when it comes to practice you will face a lot of exceptions. In most cases Customer/Business analyst could have a need to change certain relationships due to change of requirements. One common change would be to have a need of a many-to-many relationship instead one many –to-one.

Will take a scenario; If a contact can participate in an event, simply we would create a n:1 relationship in contact. In fact, one can simply fill the lookup shown in the contact form. In the db, you will have an extra field to hold the relevant event id (i.e. new_eventcontactid) in contact enity.

Now, if it is required that contact to be able to participate for more than one event, current solution is not suitable. Then you will be asked to convert current relationship to a n:n relationship. How you do it without losing the data?

Create an n:n relationship in between Contact and Event (actually new_event). If the relationship name is new_event_project, you will find a table in the SQL with the same name that holds the relationships. Actually the primary keys of the related entity instances. Now you will need to fill this tables with the data in previous n:1 table as below t-sql script does.

insert into new_event_project (new_contact_eventid,contactid,new_eventid)
select NEWID(),ContactId,new_eventcontactid 
from contact
where new_eventcontactid is not null

Now you can delete the n:1 relationship in contact entity.

Sep 13, 2011

DateFormats and Ascentium CrmService

Playing around with DateTimes seems quite hectic to me. Specially, when you work in client side with Ascentium CrmService, it becomes tricky since you need to do your operations in usual DateTime format available in JavaScript and convert them from/to methods in the service.

For example, if you need some DateTime operation done in your logic using JavaScript, for some value comes from a Fetch result, first you need to convert them to a DateTime field. Fetch returns strings. There is no simple way for that but to do it with some string operations as below.

//convert DATE String (2008-01-01T00:00:00) format 
//to DATE (Tue Aug 23 07:00:00 UTC+1000 2011)
DateFormatFromAttributeValue = function(DateStr)
{
    var yearStr, YearStr, DayStr, MonthStr, HourStr, MinStr, NewDateStr;
    yearStr = DateStr.substr(0, 4);
    MonthStr = String(DateStr.substr(5, 2) - 1); //Month goes as 0-11
    DayStr = DateStr.substr(8, 2);
    HourStr = DateStr.substr(11, 2);
    MinStr = DateStr.substr(14, 2);

    return new Date(yearStr, MonthStr, DayStr, HourStr, MinStr, 0);
}

It is interesting to see that you get three string values from the Fetch as below.


My advice is to use “value” field for all your operations even if you need just the date. I am telling this because, date string is not consistent with the length which could drag you to a mess when handling. If you see carefully, in above example, date is shown as “2” not “02”. In fact, number of characters in the string could be different when date is less than 10th day and greater than 10th Day. This should be a big concern when string functions are being used for conversions.

When you need to submit a DateTime, you got to convert it back to the previous string format (i.e. 2008-01-01T00:00:00). I use below method for that.

//convert DATE (Tue Aug 23 07:00:00 UTC+1000 2011) 
//to DATE String (2008-01-01T00:00:00) format
DateFormatPassToService = function(DateValue)
{
  var YearStr, DayStr, MonthStr, HourStr, MinStr, NewDateStr;
  YearStr = DateValue.getFullYear();
  MonthStr = String(parseInt(DateValue.getMonth()) + 1); //Month goes as 0-11
      if (MonthStr.length == 1) { MonthStr = '0' + MonthStr; }
  DayStr = String(DateValue.getDate());
      if (DayStr.length == 1) { DayStr = '0' + DayStr; }
  HourStr = String(DateValue.getHours());
      if (HourStr.length == 1) { HourStr = '0' + HourStr; }
  MinStr = String(DateValue.getMinutes());
      if (MinStr.length == 1) { MinStr = '0' + MinStr; }
  return (YearStr + '-' + MonthStr + '-' + DayStr + 'T' + HourStr + ':' + MinStr + ':00');
}


Hope this will help you.

Sep 12, 2011

Calculate business days in JavaScript (with variable business days per week)

There are lot of ways to calculate working days. Anyway, it was not easy to find a method to calculate business days if the number of working days per week is being changed. By default, working days will be Monday to Friday, but in some cases you might need to calculate days including Saturday or both Saturday and Sunday.

In my case it was required to calculate the cost of hire when renting equipments. They are to be charged according to the days they are being used. Some factories could work just 5 days while some work for 6 or 7 days per week.

I couldn’t find any method in the web to do it in client side. Below is the only way I could think of. Actually hint was given by one of the colleagues.

calcBusinessDaysExtended = function (Start, End, DaysPerWeek)
{
    Start.setHours(0);
    End.setHours(0);

    _StartUTCmilli = Date.UTC(Start.getFullYear(), Start.getMonth(), Start.getDate());
    _EndUTCmilli = Date.UTC(End.getFullYear(), End.getMonth(), End.getDate());
    var _Days = Math.floor((_EndUTCmilli - _StartUTCmilli) / 86400000) + 1;

    var _Saturdays = 0;
    var _Sundays = 0;
    var _bdays = 0;

    var nextDatOfEnd = new Date(End.setDate(End.getDate() + 1));
    for (i = Start; i < nextDatOfEnd; i.setDate(i.getDate() + 1))
    {
        if (i.getDay() == 6) { _Saturdays = _Saturdays + 1; }
        if (i.getDay() == 0) { _Sundays = _Sundays + 1; }
    }

    switch (DaysPerWeek)
    {
        case 5:
            _bdays = _Days - (_Saturdays + _Sundays);
            break;
        case 6:
            _bdays = _Days - _Sundays;
            break;
        default:
            _bdays = _Days;
    }
    return _bdays;
}

One can think, loops could affect the efficiency, but it is not really matters in client side work. I am happy if someone can provide me a better one.. Please find the relevant c# code here.

Sep 7, 2011

Difference between completing and cancelling an appointment – part 2

In my previous post (read), I suggested a method to execute a JavaScript for completion of an appointment. This method works fine, but not for one instance. If you carefully watch the tool bar of an appointment, you will notice a button for “Save as Completed”. This is a fast way of completing the appointment. Our previous method doesn’t fire for this click since event.Mode is not 5 for this, but 58.


For completion of the Appointment, We need to modify the code as below, which will work for both menu and button.

var _eventMode = event.Mode;
    if (_eventMode == 5)
    {
        var _status = document.getElementById('newStatusCode').value;
    }

    if ((_eventMode == 58) || ((_eventMode == 5) && (_status == 3)))
    {
       //code to work when completing
    } 

Aug 22, 2011

Difference between completing and cancelling an appointment – part 1

In some business logics, it is required occurring some steps when an Appointment is closed. When I started coding it, to trigger a JavaScript, I made it happen in “onSave” event as usual. Eventually I found that it is needed to check exactly what the mode of “close Appointment”. Actually closing is the deactivating the record as we understand in CRM terms. So I could simply check relevant mode (i.e. 5). Then only I understood that I need more checking before proceeding. Not like any other entity, Appointment has another option of cancelling while closing. See below menu;


Hm... It’s obvious that you need to do your task only when completing, not cancelling. Here, trick is, you need to check “newStatusCode” code for that. That’s how you need to distinguish two cases. Below code will explain it well;

if (event.Mode == 5) //Deactivate Mode
{
   var status = document.getElementById('newStatusCode').value;
        
   if (status == 3) //Status for Completed
   {
            
   }
   if (status == 4) //Status for Cancel
   {
            
   }
}


Hope this is easy.

Please read Part2.

Aug 11, 2011

Convert Appointments in to Opportunities without source campaign

You can convert Appointments in to Opportunities in Dynamics CRM and it is a handy feature. You can simply click convert activity button which result below pop-up window.


Here, source campaign comes as a required field in default. Sometimes users doesn’t use campaigns and don’t wish to see it as a required field accordingly. If are asked to change this, there is no proper way of doing it. When I play around the page code, I found some way of doing it (unsupported). You can see the page in below location;

\Program Files\Microsoft Dynamics CRM\CRMWeb\Activities\act_dlgs\convert_activity.aspx

You just have to add two lines to onload script as below.

function window.onload()
{
onSubjectInit();
cbLogResponse.checked = false; //added line 1
campaignCheckHandler();        //added line 2
}

Now source campaign is no more a required field by default.
Hope this will help you.

Aug 4, 2011

Changing the icons of default entities

Can we change the icons of default entities? Answer for this question is “No”. Don’t encourage anyone to do so. CRM 4.0 is not supporting this change. I tried to search web to find a way of doing it but failed to find a proper way. However, I managed to do a little experiment by myself to gather some information on this.

Actually entity icons for CRM 4.0 are stored in below location and they are in .GIF format.

Program Files\Microsoft Dynamics CRM\CRMWeb\_imgs\

Actually, I tried to play around with account entity. When I replace below image files, I could change the account icon in the application such as account grid and detail view of selected account.

ico_16_1 (size 16x16 pixels)
ico_16_1_d (size 16x16 pixels)
ico_18_1 (size 16x16 pixels)
ico_lrg_1 (size 66x48 pixels)

There is something tricky; this doesn’t change the icons (links) vertically lined in the left hand side navigation panel. You can see a long vertical stripe like images in below folder;

\Program Files\Microsoft Dynamics CRM\CRMWeb\_imgs\imagestrips

Particularly, entity_imgs_1.gif (18x546) does the magic. I simply couldn’t realise how one static image could be used in CRM for different configurations of navigation. You will be amazed to see how smart CRM is using this one static strip for different arrangements of navigation panel. In order to make it sure, I did a little mark in the account icon in it and checked the outcome.


It changes the navigation pane.


I don’t know whether this gives a total solution, but this will help someone who wishes to try changing the icons of default entities. Anyway, I would say something for sure; creating icons for CRM is not a job of someone who knows “something” about imaging. It should be a job of professional, because you won’t be able to create a meaning full icon in just 16x16 pixels within a transparent background, unless you are really skilful.

FYI : Good site to search for icons for Dynamics CRM http://www.softicons.com

Jul 22, 2011

Issue of reading parent entity from create form in CRM 2011

In CRM 2011, reading the parent fields from child form has a trick. For example, if you are reading a quote field while you are in quote product should be done carefully. Usually, it’s advised to do as follows;

var pageParent = window.top.opener.parent.Xrm.Page;
var preantName = pageParent.getAttribute("Name").getValue();

This doesn’t work for create forms, but Update forms! So you are required to do something like this to read from Create forms..

var preantName = window.parent.opener.crmForm.all.name.DataValue;

When I come across this, I simply wrote below method which worked for me. This handles both Create and Update form types for you. May be this can’t be the best code, but I couldn’t find a better code in the web.

function ReturnParentField(_fieldName)
{
 var FORM_TYPE_CREATE = 1;
 var FORM_TYPE_UPDATE = 2;
  
 var formType = Xrm.Page.ui.getFormType();
 var _pageParent = window.top.opener.parent.Xrm.Page;
 var _value = null;

 if (formType==FORM_TYPE_CREATE)
 {
   if (eval('window.parent.opener.crmForm.all.'+_fieldName+'.DataValue') != null)
   {
    _value = eval('window.parent.opener.crmForm.all.'+_fieldName+'.DataValue');
   }
  }
  else if (_pageParent != null)
  {
    if (_pageParent.data != null)
    {
       if (eval('_pageParent.getAttribute("'+_fieldName+'").getValue()') != null)
       {
           _value = eval('_pageParent.getAttribute("'+_fieldName+'").getValue()');
       }
     }
     else
     {
       _value = eval('window.parent.opener.crmForm.all.'+_fieldName+'.DataValue');
     }
   }
   return _value;
}

When you go through this code, you will see some complexity in the later stage when I have made it handle two ways for update form. That’s because, when you access existing record from usual associate view (_pageParent.data != null) and its possible to use getAttribute() method accordingly. In CRM 2011 contains new feature of accessing the associate records (or child records) within the form area called sub-grids which doesn’t work like this. It contained no attributes to read. Luckily, it again enables you to read parent information in most traditional way, which we have used in Create form type.

Hope this will help.

Jul 13, 2011

Deleting/ Renaming of System views

Though, deleting the system views is not possible, in most of the cases we need to do so. There is one unsupported way of doing it; actually hiding it. You got to modify a flag in relevant SQL table. Views are stored in a table called SavedQuery and you can simply see all the views of an entity by passing the entity type code to below query. (1 is for account)

select Name,* from SavedQuery where ReturnedTypeCode=1

Now for instance, if you need to delete (actually hide) view called “Accounts: No Orders in Last 6 Months”, simply set IsPrivate = 1 for relevant record as shown below.

update SavedQuery set IsPrivate = 1
where Name = 'Accounts: No Orders in Last 6 Months'

Then publish the entity.

Here, what really happens is converting the system view to a private one with no rights. Also you should be aware that, the change is not imported with customizations, but you got to do for each server. Anyway, you got to play safely since this is unsupported.

Swap System view name with new one
It was needed to create a new view with the name of an existing system view. In fact, particular system view was renamed and renamed the new view with system view name. Nothing seems wrong in steps, but this gives problems with importing the customizations. One of my colleagues found a way of doing it. Rename the System view and did a deployment. Then rename own new view with the name of the system view and do the second deployment. Problem is solved. Anyway, this doesn’t make deployment managers life easy, because he got to keep two versions of customizations for those entities.

Hope this will help you.

Jul 7, 2011

Getting rid of browser messages

Whatever the solution you provide for a client, it is important to think about it, in terms of useability engineering aspects. Simply, system should be user friendly. Recently, I came across a requirement of getting rid of two standard message pop-ups, come on the flow of actions. Though, I understood those are not errors, according to the users point, it was obviously not necessary; wastage of time.


Above message is the standard Internet explorer message which is thrown to tell you that form was not saved, but you are trying to move away. In most of the cases, when user has just one checkbox to allow some action for an existing record, user has to do that, save it and again proceed... This seems wastage of time. In such cases, we have to make it simple by saving form when user clicks to checkbox.

if (crmForm.all.new_readyForProcess.checked) 
{
    if (crmForm.FormType == CRM_FORM_TYPE_UPDATE) 
    {
        crmForm.Save();
    }
}


Other case is refreshing the form after some action such as status change. Though, browser throws this message with a big reason, it’s not applicable in these kinds of cases.


Instead of refreshing, loading the page again would help you getting rid of this message.

//window.location.reload(true); 
sURL = unescape(window.location.pathname);
window.location.href = sURL + '?id=' + crmForm.ObjectId;


Quite simple..

Jul 4, 2011

Hiding Menu Items from More Actions

I needed to remove the deactivation option from the Account entity. So I actually have to remove this from two separate menus. One is "More Action" section of the account grid. Other one is "Action" section appeared once account record is opened.

Below link gives a nice way of removing items from Action menu.
http://metrix.blogspot.com/2009/06/hiding-menu-items-from-top-menu-bar-in.html
Obviously, it can be called onLoad form of the account without any issue.

Removing items from Action menu of the grid is tricky, because we don’t know from where we can call a JavaScript to accomplish our task. After reading and researching I managed to solve this by calling a javaScript from the loading script in below page.

\Microsoft Dynamics CRM\CRMWeb\_root\HomePage.aspx

What is really cool here is, you have typecode in hand for your coding. Since I am interested in account entity, I checked its typecode (i.e. 1) and proceeded with my code. Id of the menu item relevant for deactivation was found through Developer Tools (pressing F12 as usual).

function window.onload()
{
 ...
 ...

 if (_currentTypeCode==1)
 { 
   if (document.all._MIdoActioncrmGrid1deactivate != null) 
   { document.all._MIdoActioncrmGrid1deactivate.style.display = "none";} 
 } 
 ..
}


This seems cool, yet not supported at all.. So please play safely and carefully.

Hope this will help.

Jun 30, 2011

Filtered lookup

This is simple trick that could improve the usability of a CRM application. Let me explain the requirement first. For example, we might need to add a potential customer to an entity main form. Also we might need to add a contact to the same form. In this case, most practical requirement is to show the contacts relevant to the selected customer.

Please use this function in onload of the form.

FilterLookupUponParent = function(source, target)
{
if (IsNull(source) || IsNull(target)) { return; }
var name = IsNull(source.DataValue) ? '' : source.DataValue[0].name;
target.additionalparams = 'search=' + name;
}

Use this code to call the function, passing the form field names.

FilterLookupUponParent(crmForm.all.new_accountid, crmForm.all.new_primarycontactid);

Here it is illustrated that, RAW Ltd has two contacts.


Once we use above code, when clicking the lookup field will pop up the lookup window only with those contacts that are relevant to the selected RAW Ltd. This is actually a filter. Once you release the filter, you get all the contacts.


Actually, it is also wise to call the same method is onChange event of the customer, because filter should get changed accordingly.

Hope this will help you.

Jun 23, 2011

Enhancing the Lead conversion functionality

Converting a lead to an Account/Contact/Opportunity is a standard function provided by Dynamic CRM. Either you disqualify the lead or qualify (convert). Modifying the provided convert page is quite restricted. Below article shows how to hide some of the covert options.

If you want to covert the lead to some other entity, for example, to a custom entity, it’s impossible with standard convert page. When I came across this requirement, I implemented a solution without the standard page.

This solution was flexible, but contained few steps.

1) Hide the button to the standard lead convert page.
2) Add my own menu system to lead entity
3) Implement disqualify method
4) Implement qualify(convert) method

Will consider the steps in detail;

1) Hide the button to the standard lead convert page.

I could call below method to hide the lead convert button.

hideStandardQualifyingButton = function() 
{
var lis = document.getElementsByTagName('LI');
var i = 0;
while (i < lis.length) 
{
    if (lis[i].getAttribute('title') == 'Qualify or disqualify the lead') 
    {
      //lis[i].outerHTML = '<SPAN></SPAN>' this gives errors for resizing the window afterwords
      lis[i].outerHTML = '<SPAN> <SPAN> <SPAN> <SPAN> </SPAN> </SPAN> </SPAN> </SPAN>'; 
    }
    i = i + 1;
}
}


If you check the web, you will see few places that suggest this code with the line I have commented. That works fine, but throws a page error when user resizes the browser window. Then the next line was introduced, instead.

2) Add my own menu system to lead entity


If you have play around with ISV file, this won’t be a hard task. Below are the new entries in lead entity for this.

<CustomMenus>
              <Menu>
                <Titles>
                  <Title LCID="1033" Text="Lead Conversion" />
                </Titles>
                <MenuItem JavaScript="LeadQualify();">
                  <Titles>
                    <Title LCID="1033" Text="Lead Convert" />
                  </Titles>
                </MenuItem>
                <SubMenu>
                  <Titles>
                    <Title LCID="1033" Text="Disqualify" />
                  </Titles>
                  <MenuItem JavaScript="LeadDisQualify(4);">
                    <Titles>
                      <Title LCID="1033" Text="Already Known" />
                    </Titles>
                  </MenuItem>
                  <MenuItem JavaScript="LeadDisQualify(6);">
                    <Titles>
                      <Title LCID="1033" Text="No Longer Interested" />
                    </Titles>
                  </MenuItem>
                </SubMenu>
              </Menu>
            </CustomMenus>


3) Implement disqualify method

This is the simple code you can use to disqualify the lead. ReasonCode is the integer value of disqualification reason.

oService.SetState("lead", _leadid, "Disqualified", ReasonCode);


If you want to further extend the disqualifying reasons, it’s possible. You can simply add whatever the new entries in entity in the standard way as below.

Now you can pass the relevant values to the same method. (Of course you need to add/edit the menu items in step 2 accordingly)

4) Implement qualify(convert) method

This is where you get the real fruit of the exercise. Now you can programmatically do your steps to convert your lead to any entity, including your own custom entities. For example this is a simple code I used to convert the lead to a custom entity called regional project (new_regionalproject).

var _leadid = crmForm.ObjectId;
    var _bEntity = new BusinessEntity("new_regionalproject");
    _bEntity.attributes["originatingleadid"] = _leadid;
    _bEntity.attributes["firstname"] = _firstName;
    _bEntity.attributes["lastname"] = _lastName;
    ....
    ....
 return _oService.Create(_bEntity);

Now we need to change state of the lead to qualified.

oService.SetState("lead", _leadid, "Qualified", 3);


Notes:

1) In step 4, you can actually implement any business logic since you are free to write the code before qualifying the lead. You can even Update or Associate with other entities accordingly.
For example I have converted the lead to account and created a Quote (without Quote products) using particular account as the potential customer.

2) In qualifying/disqualifying, you got to use the given methods. (i.e. SetState) Don’t try to call Update method here Since its not allowed.

Hope this will help you.

Jun 20, 2011

OnChange() event of CheckBox of CRM 4.0

OnChange() event of the CheckBoxes done in the forms of CRM 4.0 is not fired the way it should be. Ironically you can see specific place to write the code and enable the event according to usual CRM concept.

Anyway, it is easy to write the same thing (actually onClick) in onLoad form and get the thing done. Write the even function in the onload as mentioned below.

MyDemoCheckbox = function()
{
    crmForm.all.new_mydemocheckbox.onclick = function() 
    {
       //Do what you need
    }
}

Hope this will work for you.

Please check newest post on this topic.

Jun 19, 2011

Two default public views?

This is something you don’t see usually in Dynamics CRM 4.0. According to picture, it shows two default public view, which is against the norms. Surprisingly, this can happen rarely in CRM systems. This is unexplained.


What you have to do is, export the customization of particular entity and check for sections related to public views (Here I am strictly calling “Public” views; I want you to omit the Associate views, advanced find views and etc.) and find <isdefault name="Yes">1</isdefault> tag. You will find this for more than one Public View. You will have to change them to <isdefault name="No">0</isdefault>, except for the correct default public view.

Now import the customization and publish. You problem is solved.