Showing posts with label useability engineering. Show all posts

Jul 7, 2013

Coloring the Subgrid rows

As we discussed previously, we can use colours for branding purposes and improve the useability. Most clients seem happy to have different colours for different rows within the Subgrid depending on their status or etc.

For example: In my cases I have an Institute entity where sub institutes are in a Subgrid. I am going to give a colour for profit making institutes. (Highlighting expensive quote products within a Quote would make more sense for you). Outcome would be something like this;


How we going to achieve this? This consists of three steps.

1) Wait till Subgid is loaded

Biggest challenge of playing with Subgids is they load in an Asynchronous manner. In that case normal onload would not fire. So we attach a method for loading with a Delay. This is the code in loading;

setTimeout("attachGridAction();", 500);

Now we will implement the relevant method.  This got a trick. In catch statement delays and calls the method again. This allows you to wait and load the code again to see if Subgrid is loaded. Your real code will run only after that is accomplished.

function attachGridAction() 
{ 
  try 
  {
    var _grid = document.getElementById("Sub_Org_List");
    if ((_grid) && (_grid.readyState == 'complete'))
    {
        // Code goes here
    }
  }
  catch (err) 
  {
       setTimeout("attachGridAction();", 500);
  }
}

2) Determine the criteria

Now you need to determine the criteria of the records to be coloured. Actually you need to read the relevant Guids. Read the relevant Fetch XML as below. If you uncomment the second line, you will see the fetch xml statement of the Subgrid. Now you are free to retrieve those records and determine the Guids according to your criteria.

var _fetch = document.getElementById("effectiveFetchXml");
//alert(_fetch.value);

3) Colouring the row

Now you have the Guids ready. Now perform this code within a loop for your Guids; (I am just using one single record to make it clearer)

var _checkbox =   document.getElementById('checkBox_{4ACC296A-0CE5-E211-A9C3-00155D467A0E}');
var _checkboxParentParent = _checkbox.parentNode.parentNode;
_checkboxParentParent.bgColor = 'DarkKhaki'; 

Limitation;
As you may guess, this doesn’t work for next pages if paging is performed for Subgrid. What you can do is increase the items in the Subgrid allowing to have a scrollbar and ignore the paging option.

Jul 2, 2013

Change colour of Fonts, Sections and Tabs

Though Microsoft Dynamics CRM 2011 forms are nicely presented, there could be instances that you may need to change the colours. It can be for branding purposes or to improve useability aspects. Most of them could be done through loading Java Scripts. We will check some of basics here.

In these codes colour can be determined by HTML code or standard name.
Click this for a basic list of such names and relevent HTML codes.

1) Fonts and backgrounds of the Fields

//Colouring the background of the label
document.getElementById('new_name_c').style.backgroundColor="CornflowerBlue";

//Colouring the field value
document.getElementById('new_name').style.color="#8B0000";

//Colouring the label
document.getElementById('new_contactperson_c').style.color="DarkOrange";

//Colouring the background of the field value
document.getElementById('new_contactperson').style.backgroundColor = 'Gold'


2) Tabs

document.getElementById("tab1").style.backgroundColor = '#F0E68C';


3) Sections

document.getElementById('{883d8330-156d-e4e5-130b-934752157dd3}').style.backgroundColor = 'DeepSkyBlue';


We will look into much complex colouring options in another post.

Feb 25, 2013

Self-referential relationship explained

Parent-child relationship

Ability to use self-referential relationship in Dynamics CRM is quite cool. Especially, this caters the need of maintaining parent-child relationships using the same entity. Simply office entity (custom) can be used to keep records of parent office as same as child office. In fact, this is a 1:n relationship.

We will see simple way of setting up this relationship.  (Suppose I got custom entity called Test).
Simply go to the customization of the entity and move to n:1 relationships; then create new relationship. We can give meaningful (which explains parent-child relationship) names to lookup field display name and navigation item label name as below;


Now you can add this field to the main form. Now see how we see when record is opened.


Our intension is catered and the relationship is clear to the user.

Issue of using self-referential n:n

Now we will examine the usage of self-referential many-to-many relationship. Just go to n:n relationship section of the customization and create one. Relationship information will be seen as below by default.


Now this is how we see from the front end.


Confusing! This shows two associate links with the same name.

When Dynamics CRM 2011 create many-to-many relationships, it creates a third table with primary keys of the two tables involved in and front end identifies this table twice (since its self-referential, both fields contains primary key of same table) when listing the relationships for UI. This makes sense for a developer, but not for a user. Biggest issue is these two links are not the same, but two side of the relationship.

Now we will do little change to identify this. I open the relationship properties and give two different custom labels for display options. I though it’s meaningful to use something like “To” and “From” to identify the two ends as below;


Now I am able to identify two associate links of our relationship distinctly. Now I open my sample record “test  000” and add “test 001” and “test 002” records as “related to” as shown below.


Now open one of “test 001” or “test 002” and see how the related record is shown. (Under “Related From” link)


I think this explains the role of two links very clearly.

After giving the custom labels this relationship became “little” clearer. That means, when using self-referential n:n, at least we have to give a “meaning” to the relationship that gives distinct names to two sides. Ex: “advised by – advised to” and etc. Otherwise this becomes a mess to the user. This is a constraint.

If we take the big picture, CRM 2011 got a smart concept of maintaining relationships which is called Connections. So it is recommended to use Connections for most cases.

Below presentation summarize the way Connections can be used.


Hope this is helpful.

Jan 16, 2013

Subgrids in terms of relationship types

Subgrids are new enhanced feature in CRM 2011 forms. They can be considered as alternatives for associate views.  Yet it got something more and it caters some of the usability engineering aspects too. Though it doesn’t contain any complexity, I thought of writing this explanation.

When we add a subgrid, we basically have one main option to select; it’s to show “All records” or “Only related records”. If you need to show all records you have all the entities to choose from. If you need to have related records only, you have much shorter list. They are the entities with relationship to the entity we are customizing right now. Check the difference in below illustration.


Showing the related records is something theoretically identical to an associate view, but showing all the records is something new. This invites designers and architects to grasp a new thought. In other terms we are now allowed to have an editable reference list (of information) within a form.

Now we will from the users view point. For my example I consider an entity called “office” which got a subgrid of designations. Designation is another entity.

1) Office has no relationship with designation


When you select the subgrid/ sub record relevant ribbon button offers you buttons to do all the operations of designation entity such as Add new, Edit and Delete.  Here I don’t need to show any link to designation from anywhere else of the CRM since I am capable of handling it from the subgrid.

2) Office has a 1:n relationship with designation


In this case we see an extra button called “Add existing designation” which leads to a wizard which gives full control of adding designations to the current subgrid.

3) Office has n:n relationship with designation


Now you don’t get add new button here but other buttons such as remove.

Subgrid is a nice improvement in CRM 2011, yet they are to be carefully selected in terms of the relationship type, as required. Also, by looking at the ribbon we can identify the entity relationship behind it.

Oct 21, 2012

Rule definitions to enable buttons for All RECORDS or SELECTED REDCORDS

This is a handy way of enabling the buttons either for “all records” or “selected once”. I will explain a scenario as below;

Consider an action you need to do against the records populated in a grid/subgrid. Typically we may need to do the action in two ways;

1) We may need to select records and perform the action
2) We may need to perform action for all the records

My solution is to introduce two custom buttons with two rule definitions that work well in terms of useability engineering aspects.

When loading the grid you will see only “All records” button enabled as below. (Pic. A). Idea is, if user interested in executing the action against all record, nothing to worry, just press it.


Suppose, we need to cherry pick the records. Now as soon as we start to select records, we get the view of this. (Pic. B).


Now only “Selected records” button is enabled. There is no confusion; one can execute the action only for selected items. If user deselects everything again, ribbon buttons will get changed to previous state again. (Pic. A)

Now we will see the simple way of defining the enabling rules for both buttons.

<RuleDefinitions>
  <TabDisplayRules />
  <DisplayRules />
  <EnableRules>
    <EnableRule Id="Mscrm.Cu_Selected">
      <SelectionCountRule 
        AppliesTo="SelectedEntity" Maximum="25" Minimum="1">
      </SelectionCountRule>
    </EnableRule>
    <EnableRule Id="Mscrm.Cu_SelectedAll">
      <SelectionCountRule 
        AppliesTo="SelectedEntity" Maximum="0" Minimum="0">
      </SelectionCountRule>
    </EnableRule>
  </EnableRules>
</RuleDefinitions>

Value 25 can be changed as you wish, which marks the maximum number you can select keeping the select button enabled.

Related articles;
How to proceed with All RECORDS (i.e. Scenario A) for Advanced Find results : Click here
How to proceed with SELECTED RECORDS (i.e. Scenario B) : Click here

Sep 26, 2012

Execute a Dialog in form events

Dialogs are initially introduced to use through a given button and select one from the list in the resulted pop-up page. I think it could be used to get executed in different form events. Typically, when change a drop down, system can prompt a Dialog to get some responses related to that action which will do some other operation.

We can execute Dialog from any action. Check the method I use for this;

function launchDialog(_dID, _eName, _rId)
{

var sUri = Mscrm.CrmUri.create('/cs/dialog/rundialog.aspx');

window.open(sUri + '?DialogId=' + _dID + '&EntityName=' + _eName + '&ObjectId=' + _rId, null, 'width=615,height=480,resizable=1,status=1,scrollbars=1');

}

We need to pass three parameters here. Check the calling part as below;

    var _workflowid = 'f2057c43-0670-4384-93d4-ac6147611c98';
    var _onjecttype = 'new_insurance';
    var _instanceid = crmForm.ObjectId;

    launchModelDialog(_workflowid, _onjecttype, _instanceid);

Though other two parameters are familiar, not workflow id. Ok now this is the way of obtaining it;
- Import the customization of the Dialog
- Open the customization file
- Search for word “Workflow”

You will see this kind of section which gives you the workflow id.

<Workflows>
<Workflow WorkflowId="{f2057c43-0670-4384-93d4-ac6147611c98}" Name="Insurance Renewal">
....
</Workflow>
</Workflows>

Caution

1) Be careful when deploying the since Guid of the workflow is different in different environments. So you have to change it accordingly.

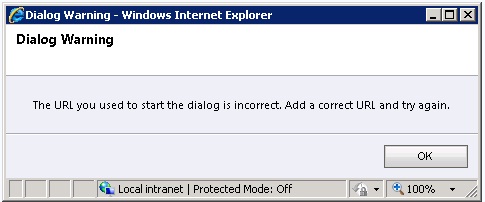
2) One could feel like using a Dialog for an operation which has nothing to do with individual record (record instance). In such occasions, though it is logical to think not to pass any value for instance id, it is a must to pass one. If you don’t pass, Dialog will not pop-up as expected, but below message will be thrown.


Conceptually, Dialog is always defined against an individual record.

Jul 16, 2012

Script error of Follow up button

When clicking the Follow up button, sometimes users see a script error as by the bottom left of corner of the browser.


This occurs since your form assistant is disabled. Obviously, this is a contradiction.  Follow up pane should get loaded in form assistant section, which is not available.

Form Assistant and Follow up
So, when you design the form, you have to think Follow up functionality together with form assistant.

1) Option 1: If you want follow up, your form assistant should be enabled
For this, go to customizations > Open relevant entity > click Forms and Views > Open Form > Open Form prosperities > Click display tab.
Then enable the Form assistant by clicking the check box.


2) Option 2: If you want form assistant to be disabled, follow up button should be removed
How to remove the button using JavaScript is discussed here.

Decide this in terms of your useability expectations.

May 10, 2012

Custom button: Must show both icon and title!

CRM form has a toolbar that contains most needed built in buttons such as SAVE, CLOSE and etc. It also allows you to create your own action buttons too. This is pretty straight forward. Usually, we are allowed to have icon and title for those buttons along with tooltip.

If we add number of custom buttons, there could be a space problem since width of the toolbar is limited. CRM is doing something smart to show only icon when there is an issue of space. You will sometimes notice that you see both icon and title only when a form is maximized.


Even if we add more custom buttons through ISV, we can hide them according to the current status of the form when loading. We discussed it here. However, this doesn’t release any space.  In fact, hiding some of the custom buttons through JavaScript doesn’t solve the space issue. This results in showing only the icons for the custom buttons while a lot of free space is visible.

If we need to show both icon and title necessarily, there is no simple recommended way. However I tried one out-of-box method that worked for me. This is not a Microsoft supported way.

It contains below three steps.

1) Create images that contains icon and text both

Even you are not a graphic designer; there is an easy way to do this. Just add the custom button (with title) to another test entity and get a screen print which will give you the chance of creating a nice image that got the CRM look and feel. Then load this to usual CRM image folder. (Program Files\Microsoft Dynamics CRM\CRMWeb\_imgs)


2) Change ISV entry

Now you need to do two changes to ISV entry as below.

<!--Original -->
<Button JavaScript="ReadySale();" Icon="/_imgs/ico_18_sales.gif" PassParams="1">
  <Titles>
     <Title LCID="1033" Text="Ready for Sale" />
  </Titles>
  <ToolTips>
     <ToolTip LCID="1033" Text="Ready for Sale" />
  </ToolTips>
</Button>

<!--Changed entry -->
<Button JavaScript="ReadySale();" Icon="/_imgs/ico_18_sales_EXT.gif" PassParams="1">
   <ToolTips>
        <ToolTip LCID="1033" Text="Ready for Sale" />
   </ToolTips>
</Button>

You need to replace the image name with your new one and remove the title tag. Obviously, if you keep the title tag, you will see the title twice if form toolbar stretches with enough space.

3) Ignore style of the button on loading

Now we should understand that CRM styles are applied to each and every component of the toolbar. So usually it doesn’t allow you to keep long text along with the icon. So you need to remove relevant style from the tag in onload event.

var _list = document.getElementsByTagName('LI');
var m = 0;
while (m < _list.length)
{
  if (_list[m].getAttribute('title') == 'Ready for Sale') 
  {
   var str = _list[m].outerHTML;
   var str1 = str.replace("ms-crm-Menu-ButtonFirst", "");
   _list[m].outerHTML = unescape(str1);
  }
  m = m + 1;
}

Mission accomplished!

Apr 16, 2012

Hide default toolbar items and separator

It is usually required to hide some of the default tool bar items appear under each entity depending on the requirement. “Look Up Address...” is one such item. Quote or Order like entities got Recalculation button by default and etc.

In those cases, we know how to hide them by identify those tags with their tooltips (titles) in UI. For example below code will hide Print button of the quote. See how we got it from its title. This is something we know.

//print button
    var lis1 = document.getElementsByTagName('LI');
    var j = 0;
    while (j < lis1.length)
    {
        if (lis1[j].getAttribute('title') == 'Print Quote for Customer')
        { lis1[j].outerHTML = '<SPAN> <SPAN> <SPAN> <SPAN> </SPAN> </SPAN> </SPAN> </SPAN>'; }
        j = j + 1;
    }

Anyway, if you do above exercise for few buttons, you will notice that separator symbol (i.e. |) is still appearing there and it could create some messy look as below.


In this case, there is another script to hide them too. Below is the script for that. This hides all the separators. I think that’s better than keeping untidy separators in the tool bar.

//seperator
    var lis2 = document.getElementsByTagName('img');
    var k = 0;
    while (k < lis2.length)
    {
        if (lis2[k].getAttribute('id') == 'mnu_hSpacerGrid')
        { lis2[k].outerHTML = '<SPAN> <SPAN> <SPAN> <SPAN> </SPAN> </SPAN> </SPAN> </SPAN>'; }
        k = k + 1;
    }

Mar 21, 2012

onChange vs onClick for checkbox?

Previously I wrote a post to tell how to use onClick event in CRM 4.0 for checkboxes. Recently I felt it is not completed. I think, it’s a matter of usability engineering expectations. You can simply use either onChange or onClick for checkboxes.

Will check onChange;
You can simply double click the field in customization form view and see the event. Then you know how to add the script in the relevant box and enable it. It’s as simple as that.


For example put below alert statement to check the firing of the event.

alert("onChange event fired");

Now if you browse the form after publishing... try to change the value of checkbox. What you will notice is you have to do two clicks to fire the event. You got to click the checkbox (nothing happens) and click somewhere else (to take the focus away) to confirm your change... then you can see the alert message pops up.

Will check onClick;
Here you are not touching anything in the relevant field... but write a method in the loading of the form as below. Now if you browse the form and do the previous test here.. you will notice, once you click the checkbox alert triggers. This means you only need one click.

deliveryCheckbox();

deliveryCheckbox = function()
{
    crmForm.all.msn_isDelivery.onclick = function()
    {
        alert("onClick event fired");
    }
}

As a conclusion, I would suggest you to use onClick for all the cases, if there is no special reason to use onChange. My point is “not just saving one mouse click” our users are not always technical people. I have seen users just click the check box and try to save the form. If we have used a script to work for onChange event, it wouldn’t have happened in such cases.

Related Posts;
Issues of using checkbox in CRM 2011

Aug 4, 2011

Changing the icons of default entities

Can we change the icons of default entities? Answer for this question is “No”. Don’t encourage anyone to do so. CRM 4.0 is not supporting this change. I tried to search web to find a way of doing it but failed to find a proper way. However, I managed to do a little experiment by myself to gather some information on this.

Actually entity icons for CRM 4.0 are stored in below location and they are in .GIF format.

Program Files\Microsoft Dynamics CRM\CRMWeb\_imgs\

Actually, I tried to play around with account entity. When I replace below image files, I could change the account icon in the application such as account grid and detail view of selected account.

ico_16_1 (size 16x16 pixels)
ico_16_1_d (size 16x16 pixels)
ico_18_1 (size 16x16 pixels)
ico_lrg_1 (size 66x48 pixels)

There is something tricky; this doesn’t change the icons (links) vertically lined in the left hand side navigation panel. You can see a long vertical stripe like images in below folder;

\Program Files\Microsoft Dynamics CRM\CRMWeb\_imgs\imagestrips

Particularly, entity_imgs_1.gif (18x546) does the magic. I simply couldn’t realise how one static image could be used in CRM for different configurations of navigation. You will be amazed to see how smart CRM is using this one static strip for different arrangements of navigation panel. In order to make it sure, I did a little mark in the account icon in it and checked the outcome.


It changes the navigation pane.


I don’t know whether this gives a total solution, but this will help someone who wishes to try changing the icons of default entities. Anyway, I would say something for sure; creating icons for CRM is not a job of someone who knows “something” about imaging. It should be a job of professional, because you won’t be able to create a meaning full icon in just 16x16 pixels within a transparent background, unless you are really skilful.

FYI : Good site to search for icons for Dynamics CRM http://www.softicons.com

Jul 7, 2011

Getting rid of browser messages

Whatever the solution you provide for a client, it is important to think about it, in terms of useability engineering aspects. Simply, system should be user friendly. Recently, I came across a requirement of getting rid of two standard message pop-ups, come on the flow of actions. Though, I understood those are not errors, according to the users point, it was obviously not necessary; wastage of time.


Above message is the standard Internet explorer message which is thrown to tell you that form was not saved, but you are trying to move away. In most of the cases, when user has just one checkbox to allow some action for an existing record, user has to do that, save it and again proceed... This seems wastage of time. In such cases, we have to make it simple by saving form when user clicks to checkbox.

if (crmForm.all.new_readyForProcess.checked) 
{
    if (crmForm.FormType == CRM_FORM_TYPE_UPDATE) 
    {
        crmForm.Save();
    }
}


Other case is refreshing the form after some action such as status change. Though, browser throws this message with a big reason, it’s not applicable in these kinds of cases.


Instead of refreshing, loading the page again would help you getting rid of this message.

//window.location.reload(true); 
sURL = unescape(window.location.pathname);
window.location.href = sURL + '?id=' + crmForm.ObjectId;


Quite simple..