Showing posts with label Azure. Show all posts

Sep 23, 2022

Azure AD B2C to handle login for Portal

Recently I realized that Azure AD B2C is already playing a big role in Portal user access. So I jumped into it and wanted to learn fundamentals. I managed configure Azure AD B2C as the method of login, new registrations etc. Here I am documenting the steps.

1. Register the Portal in Azure AD B2C

Though there is a new App registration link, I started with legacy link.


Please find below the configuration details. Reply URL is needed later (i.e. A)

Once save, you will get Application ID (i.e. B)


2. Configure Sign in Policy / Criteria for Identity Provider

Go to User flows to start this and select Sign up and sign in option in resulting window.


Here, it is essential to give Email sign up as the type of method/ Identity Provider


Now we need to set user attributes and claims. There are more combinations to play around, but what I need is to just to use First Name, Surname along with Email to use to match the users, though collecting few more attributes in registration. Hence, below is my setting.


Other important thing is selecting tfp for claim representing user flow.


Now, you are ready to save and Run user flow and save the issuer link. (i.e. C) which is visible once you click the resulting hyperlink.


3. Configure the Portal

Now go to Portal management > Site Settings to enter below entries as the final step of the exercise.

Entry 1: Use Issuer Url


> Entry 2: Use redirect URL


> Entry 3: User Application ID


> Entry 4: Use Name, Surname and Email for mapping. (value: emailaddress1=http://schemas.xmlsoap.org/ws/2005/05/identity/claims/emailaddress,firstname=http://schemas.xmlsoap.org/ws/2005/05/identity/claims/givenname,lastname=http://schemas.xmlsoap.org/ws/2005/05/identity/claims/surname)


> Entry 5 (Optional): If same fields are to be mapped during sign in add this entry. (value: emailaddress1=http://schemas.xmlsoap.org/ws/2005/05/identity/claims/emailaddress,firstname=http://schemas.xmlsoap.org/ws/2005/05/identity/claims/givenname,lastname=http://schemas.xmlsoap.org/ws/2005/05/identity/claims/surname)


> Entry 6: Add this entry to make sure is new Contact registers, it allows to check the Contact entry to map the email


> Entry 7


Now browse to the Portal and click Sign in. You will get new login page from Azure AD B2C! Most importantly its going to handle all the user managements for you.


If you click, you will notice all the other fields we selected in attributes and claim section would appear.

Mar 31, 2019

Microsoft Cognitive Services – Speech recognize

Microsoft Cognitive services allow you using many advance Machine Learning driven services easily. This offering consists of Visual identification, Speech identification etc. These services typically should be gained as an Azure service. Anyway, here we try Speech recognition API using a trial subscription (no Azure needed).

1. Get the trial subscription

a. Browse to Cognitive Service trial link here.

b. Select Speech API tab

c. Click Get API Key and click Next while region is selected (Default: United States)

d. Resulting page would show relevant API endpoint and keys.

2. Sample Console Application to test

a. Start Visual Studio 2017

b. It is required to have .NET cross-platform development workload is available.
To check go to Tools > Get Tools and Features


c. Open a New Console Application


d. Now install Speech NuGet Package


     Search for Microsoft.CognitiveServices.Speech and install the resulting Package.


e. Add the code as below;

using System;
using System.Threading.Tasks;
using Microsoft.CognitiveServices.Speech;

namespace CognitiveSrvSpeech1
{
    class Program
    {
        static void Main()
        {
            RecognizeSpeechAsync().Wait();
            Console.WriteLine("Please press a key to continue.");
            Console.ReadLine();
        }

        public static async Task RecognizeSpeechAsync()
        {
            var config = SpeechConfig.FromSubscription("<Subscription Key>", "<Region>");
            // Creates a speech recognizer.
            using (var recognizer = new SpeechRecognizer(config))
            {
                Console.WriteLine("Please say the text you need to convert...");
                var result = await recognizer.RecognizeOnceAsync();
                // Checks result.
                if (result.Reason == ResultReason.RecognizedSpeech)
                {
                    Console.WriteLine($"We recognized: {result.Text}");
                }
                else if (result.Reason == ResultReason.NoMatch)
                {
                    Console.WriteLine($"NOMATCH: Speech could not be recognized.");
                }
                else if (result.Reason == ResultReason.Canceled)
                {
                    var cancellation = CancellationDetails.FromResult(result);
                    Console.WriteLine($"CANCELED: Reason={cancellation.Reason}");

                    if (cancellation.Reason == CancellationReason.Error)
                    {
                        Console.WriteLine($"CANCELED: ErrorCode={cancellation.ErrorCode}");
                        Console.WriteLine($"CANCELED: ErrorDetails={cancellation.ErrorDetails}");
                        Console.WriteLine($"CANCELED: Did you update the subscription info?");
                    }
                }
            }
        }
    }
}

Make sure you replace the <Subscription Key> and <Region> with the values you obtained in 1.d step. Region is westus, if you left default United States region when getting the trial subscription.

f. Run the application and see how what you say is converted to text. Enjoy!


Ref: https://docs.microsoft.com/en-us/azure/cognitive-services/speech-service/quickstart-csharp-dotnetcore-windows

Jul 2, 2018

Pass Dynamics 365 execution context to ASB (TwoWay), use Listner and retrieve back via Azure Aware Plug-in

Last time we understood how to pass the Dynamics 365 Plug-in context to Azure Service Bus without a Queue, but with a Listener. Let's extend our experience by using a TwoWay Designation type and Azure Aware Plug-in to retrieve contact back from end-point.

a) Register TwoWay Endpoint

As we did many times, Copy the Connection String from Policy of Azure Service Bus.


Now copy in the Service End Point entry of Plug-in Registration Tool.


In resulting detail page, change do below changes;
a. Select TwoWay for the Designation Type
b. Add https: to Namespace Address
c. Give a name to Path.


b) Implement Listener

Now implement below Listener code in new Console Application.

Need to install below Nuget Packages;
a. Microsoft.Crm.Sdk.CoreAssemblies
b. WindowsAzure.ServiceBus

using System;
using System.Collections.Generic;
using System.Linq;
using System.Text;
using System.Threading.Tasks;
using Microsoft.Xrm.Sdk;
using Microsoft.ServiceBus.Messaging;
using System.Runtime.Remoting.Contexts;
using System.ServiceModel;
using Microsoft.ServiceBus;

namespace AsbListnerTwoWay
{
    class Program
    {
        static void Main(string[] args)
        {
            string asbAccessKeyName = "Sum1ServiceBusPolicy";
            string asbAccessKey = "7WxSLRMvYF0A3HbLUgfQeqIEb1eKsHgg5mrUwc=";
            string asbEndPoint = "https://sumeservicebus1.servicebus.windows.net";

            var serviceHost = new ServiceHost(typeof(TwoWayServiceEndpoint));
            var transportClient = new TransportClientEndpointBehavior(TokenProvider.CreateSharedAccessSignatureTokenProvider(asbAccessKeyName, asbAccessKey));
            serviceHost.AddServiceEndpoint(typeof(ITwoWayServiceEndpointPlugin), new WS2007HttpRelayBinding(), asbEndPoint).EndpointBehaviors.Add(transportClient);
            serviceHost.Open();
            Console.ReadLine();
        }
    }

    public class TwoWayServiceEndpoint : ITwoWayServiceEndpointPlugin
    {
        string ITwoWayServiceEndpointPlugin.Execute(RemoteExecutionContext executionContext)
        {
            string message = executionContext.PrimaryEntityId.ToString();
            Console.WriteLine("Record Id : {0}", message);
            return message;
        }
    }
}

c) Implement Azure Aware Plug-in

Now read Service End Point Id by going to properties of the entry we created in first step as below;


..and implement a Plug-code (for Account Post Create). This code consist of Service End Point reference which uses the Id we read above.

using System;
using Microsoft.Xrm.Sdk;

namespace SumeTrial3Plugin
{
    public class AccountPostCreate : IPlugin
    {
        public void Execute(IServiceProvider serviceProvider)
        {
            Guid serviceEndPointId = new Guid("63c5c746-e07d-e811-a967-000d3ad1c0d2");
            IPluginExecutionContext pluginContext = 
                (IPluginExecutionContext)serviceProvider.GetService(typeof(IPluginExecutionContext));
            ITracingService tracingService = (ITracingService)serviceProvider.GetService(typeof(ITracingService));
            IServiceEndpointNotificationService service = 
                (IServiceEndpointNotificationService)serviceProvider.GetService(typeof(IServiceEndpointNotificationService));

            try
            {
                tracingService.Trace("Passing Context to Service Endpoint");
                string response = service.Execute(new EntityReference("serviceendpoint",serviceEndPointId), pluginContext);
                if (!String.IsNullOrEmpty(response))
                {
                    tracingService.Trace("response : {0}", response);
                }
                tracingService.Trace("Plug-in completed");
            }

            catch (Exception ex)
            {
                tracingService.Trace("Error: {0}", ex.Message);
                throw;
            }
        }
    }
}

Then register this plug-in as usual through Plug-in registration tool.


d) Test the operation

Now execute the Console Application (Listener) and Create an Account in Dynamics 365. You will notice below two;

1) Console Application/ Listener program pics the Context and write the Id.


2) If you check, Plug-in Trace Log, you will see the response has been retrieved by the Plug-in back.


Jun 29, 2018

Pass Dynamics 365 execution context to Azure Service Bus (OneWay) and read through Console Application (Listener)

In previous post, we understood how to pass the Dynamics 365 execution context to Azure Service Bus Queue and read through a Console App. Lets see how to pass the execution context to be read through a Listener bind to the endpoint. Here we don't use a Queue. (In our previous post we have also shown how to configure ASB from scratch).

1) Create a Service Policy in ASB

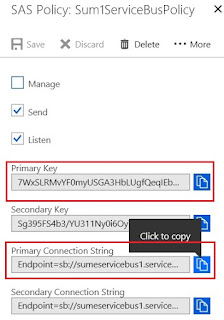
This time create a Shared Access Policy for Azure Service Bus in root level.


Once created, we can see all the details once open it. Copy Primary Connection String of the Policy.


2) Register Service End Point

Now Open the Plug-in Registration Tool and go to Register > New Service Endpoint which results a pop-up. Now paste the Primary Connection String we copied in previous step.


Now do below changes in resulting Service Endpoint entry;

a. Select OneWay for the Designation Type
b. Add https: to Namespace Address
c. Give a name to Path.


Now register a step for Lead entity for Create message. Make sure you register this in Asynchronous mode.


Now go to D365 and create a Lead record and check System Jobs, where you will notice an exception since there is no listener for endpoint as below;


3) Implement Listener to Endpoint

Let's implement a listener for the endpoint through a Console Application.

For that below NuGet Packages needed to be installed;
a. Microsoft.Crm.Sdk.CoreAssemblies
b. WindowsAzure.ServiceBus

Also notice that we have used Policy Name and Key (i.e. Primary Key) from the Policy we created.

using System;
using System.Collections.Generic;
using System.Linq;
using System.Text;
using System.Threading.Tasks;
using Microsoft.Xrm.Sdk;
using Microsoft.ServiceBus.Messaging;
using System.Runtime.Remoting.Contexts;
using System.ServiceModel;
using Microsoft.ServiceBus;

namespace AzureServiceBusListener
{
    class Program 
    {
        static void Main(string[] args)
        {
            string asbAccessKeyName = "Sum1ServiceBusPolicy";
            string asbAccessKey = "7WxSLRMvYF0myA3HbLUgfQeqIEb1eKsHgg5mrUwc=";
            string asbEndPoint = "https://sumeservicebus1.servicebus.windows.net";

            var serviceHost = new ServiceHost(typeof(TestRemoteService));
            var transportClient = new TransportClientEndpointBehavior(
                TokenProvider.CreateSharedAccessSignatureTokenProvider(asbAccessKeyName, asbAccessKey));
            serviceHost.AddServiceEndpoint(typeof(IServiceEndpointPlugin),
                new WS2007HttpRelayBinding(), asbEndPoint).EndpointBehaviors.Add(transportClient);
            serviceHost.Open();
            Console.ReadLine();
        }
    }

    public class TestRemoteService : IServiceEndpointPlugin
    {
        public void Execute(RemoteExecutionContext executionContext)
        {
            Console.WriteLine("Entity Name : {0}, Record Id : {1}", 
                executionContext.PrimaryEntityName, executionContext.PrimaryEntityId);
        }
    }
}

Now run this program and start Creating Leads. Now you will notice Listener is picking the context each time a new Lead is Created.


References;
https://blogs.msdn.microsoft.com/swetagu/2016/04/12/crm-azure-service-endpoint-and-listener-deep-dive/
https://nishantrana.me/2017/03/22/configure-dynamics-365-and-azure-service-bus-integration-using-oneway-relay-and-listener/
https://msdn.microsoft.com/en-us/library/gg334377.aspx

Jun 27, 2018

Pass Dynamics 365 execution context to Azure Service Bus Queue and Consume through a Console Application

This is the first exercise I performed to see how Dynamics 365 can be integrated with Azure Service Bus.

1) Configure Azure Service Bus and a Queue

Search for Azure Service Bus in Azure and create one. I have given below details. SumeRG1 is my existing Resource Group.


One its ready I would like to create a Queue by selecting it through menu items as below.


Below shows details I gave in in Queue.


Now I create a Shared Policy.


Once save the policy you will be able to see all the policy details including the Primary Connection String, which we need to copy.


2) Pass the context through

Now connect to your Dynamics 365 instance in Plug-in Registration Tool and go to Register > New Service Endpoint which result a dialog box. Now Paste the Primary Connection String we copied in previous step.


Then you will see how Service End Point Details get populated.


Now add a new step to newly registered Service End point entry in Plug-in Registration Tool. In my example I am adding Create Message of Contact.


Now Create a Contact in Dynamics 365 and notice one message has been pushed to d365azurequeue as below;


3) Consume the Queue Item through a Console Application

To consume the Queue Item I am creating a Console Application. Make sure you add below NuGet Packages to your application.


..and below is my code. Please note this Connection String is the same one we used to connect to Plug-in Registration Tool, which we copied from SAS Policy.

using System;
using System.Collections.Generic;
using System.Linq;
using System.Text;
using System.Threading.Tasks;
using Microsoft.ServiceBus.Messaging;
using Microsoft.Xrm.Sdk;
using System.Runtime.Remoting.Contexts;

namespace ReadAzureServiceBus
{
    class Program
    {
        static void Main(string[] args)
        {
            Console.WriteLine("Testing Azure Service Bus Queue Records pushed from D365");

            var connectionStr = "EntityPath=d365azurequeue;Endpoint=sb://sumeservicebus1.servicebus.windows.net/;SharedAccessKeyName=RootManageSharedAccessKey;SharedAccessKey=FcM+XYZSL7FOVIMXJIdg0Gk1uK3ipU51hUSrC50N4UyCTo=";

            var client = QueueClient.CreateFromConnectionString(connectionStr);

            client.OnMessage(message =>
            {
                var context = message.GetBody<RemoteExecutionContext>();
                Console.WriteLine("Entity Name : {0} and Id : {1} ", context.PrimaryEntityName, context.PrimaryEntityId);
            });
            
            Console.ReadLine();
        }
    }
}

Once execute I get below result as expected;


Interestingly, if you refresh the Queue in Azure Service Bus, we can see Queue Item has been consumed (i.e. removed).

This is actually the fundamental idea of using Azure Service Bus for integration of Dynamics 365 with third party applications. I find this cool ! You know why, not like many other integration techniques we use, here we can see message is being added to the queue and stay in waiting status to be consumed. In fact, this decoupling is significant and nothing get lost in thin air.

References;
https://community.dynamics.com/365/b/xrmandbeyond/archive/2017/11/11/message-queueing-in-dynamics-365-with-azure-service-bus
https://nishantrana.me/2017/03/22/configure-dynamics-365-and-azure-service-bus-integration-through-queue-and-queueclient/

Jun 7, 2018

Schedule Web Job with Azure Scheduler

In this example, I am using a console application since it’s easy to demonstrate. Below is the simple Console Application I am using.


Now publish the Console Application as a Azure Web Job.


Select Run on Demand as the run Mode.


Then select Microsoft Azure App Service as publish target.


Now select Subscription, Resource Group as View and existing App Service in next window.


Now validate the connection before publishing.


Now login to Azure (https://portal.azure.com/) subscription used to publish this app.
Now browse to App Service > Web Jobs where you will see the Web Job just published.


Here we able to Run and check the Logs, which will show the execution steps.


Here we see the text in log, we intended to write in our Console application.


Anyway, our plan is to schedule this execution. For that we need to go to Scheduler as below.


Once we press Create, resulting page requires a lot of details like Subscription, Job collection, Action Settings and Schedule data. One of the import detail is URL.


This is how you need to compile the URL;
Go to Properties of the Web Job and read these important parts and compile the URL as below format.


https://<B>:<C>@<A without "https://" part>

Once scheduler is enabled, you will see its recurring execution as expected.