Base of Views in Dataverse is actually fetchxml. Views got limitations. Not all the features of Fetchxml being used in creation of views. In other hand Fetchxml builder allows filter data based on complex fetchxmls and it allows creating views in Dataverse based on them. Someone would thing, just as I did, this can be a way to views with more complex criteria. Hm.. lets find out.
Lets take this example. We have below hierarchy of entities.
Out requirement is to create a view of Sub Depots where Account Category = Distribution and you need to show both Sub Depots against the Account Name.
Lets try this in Dataverse OOB capabilities.
Though you can easily set the criteria, you will not be able to show the Account name since Account entity is 3 hops away as per the given hierarchy of entities. You are only able to show just two levels. In this case, Sub Depots and Depots.
Lets try Fetch Xml Builder of Xrm Tool Box.
And Results showing without any issue.
Now we will try our next step of transferring this same Fetch to Dataverse.
Now select Save View as option;
Then you get below option to select if you need a personal or system view.
Then you are allowed to give a name to the new view.
View is now created.
Lets try the view now in Dataverse. When you check the fields you will see Dataverse is throwing a error saying these Account fields to be removed,
If you try to run as it is, it will through below error message.
Conclusion
NO!
You cannot use Fetch Xml Builder to create Views in Dataverse that extends the limitations.
Once we remove all the possible dependencies for an Entity, we are allowed to Delete it in Dynamics 365. Once in a while it doesn’t behave as expected. I faced one such case recently. Though I removed every possible/visible dependency, I couldn’t delete the Entity (say Region, new_region). It shows me some more Form dependencies.
In such case, what you need to do is create a Temporary Solution and add only the Entity that Form belongs to, Import it, Unzip and Open Customization.xml in readable editor. Now search for the Entity Schema name (i.e. new_region) you need to delete. Most probably, you will find section like below.
Explanation
This means dependency is on one of the Filter of lookup fields within that Form. If you browse to the customisation of that Form you will see particular Lookup Filter is not even enable. My hunch is, previously this Lookup filter may have been configured to filter by the relationship with the entity we are going to delete. This <DependentAttributeType> tag may not have been removed once disabling the Filter of the lookup or even when deleting the relationship.
How to Fix
Enable the Lookup filter and set a different filed (ex. By Owner) and publish. Then this troublesome tag will be replaced with this new type. Now we can delete our Entity. Now you can disable the Filtered lookup as necessary.
Ability to use self-referential relationship in Dynamics CRM is quite cool. Especially, this caters the need of maintaining parent-child relationships using the same entity. Simply office entity (custom) can be used to keep records of parent office as same as child office. In fact, this is a 1:n relationship.
We will see simple way of setting up this relationship. (Suppose I got custom entity called Test).
Simply go to the customization of the entity and move to n:1 relationships; then create new relationship. We can give meaningful (which explains parent-child relationship) names to lookup field display name and navigation item label name as below;
Now you can add this field to the main form. Now see how we see when record is opened.
Our intension is catered and the relationship is clear to the user.
Issue of using self-referential n:n
Now we will examine the usage of self-referential many-to-many relationship. Just go to n:n relationship section of the customization and create one. Relationship information will be seen as below by default.
Now this is how we see from the front end.
Confusing! This shows two associate links with the same name.
When Dynamics CRM 2011 create many-to-many relationships, it creates a third table with primary keys of the two tables involved in and front end identifies this table twice (since its self-referential, both fields contains primary key of same table) when listing the relationships for UI. This makes sense for a developer, but not for a user. Biggest issue is these two links are not the same, but two side of the relationship.
Now we will do little change to identify this. I open the relationship properties and give two different custom labels for display options. I though it’s meaningful to use something like “To” and “From” to identify the two ends as below;
Now I am able to identify two associate links of our relationship distinctly. Now I open my sample record “test 000” and add “test 001” and “test 002” records as “related to” as shown below.
Now open one of “test 001” or “test 002” and see how the related record is shown. (Under “Related From” link)
I think this explains the role of two links very clearly.
After giving the custom labels this relationship became “little” clearer. That means, when using self-referential n:n, at least we have to give a “meaning” to the relationship that gives distinct names to two sides. Ex: “advised by – advised to” and etc. Otherwise this becomes a mess to the user. This is a constraint.
If we take the big picture, CRM 2011 got a smart concept of maintaining relationships which is called Connections. So it is recommended to use Connections for most cases.
Below presentation summarize the way Connections can be used.
Subgrids are new enhanced feature in CRM 2011 forms. They can be considered as alternatives for associate views. Yet it got something more and it caters some of the usability engineering aspects too. Though it doesn’t contain any complexity, I thought of writing this explanation.
When we add a subgrid, we basically have one main option to select; it’s to show “All records” or “Only related records”. If you need to show all records you have all the entities to choose from. If you need to have related records only, you have much shorter list. They are the entities with relationship to the entity we are customizing right now. Check the difference in below illustration.
Showing the related records is something theoretically identical to an associate view, but showing all the records is something new. This invites designers and architects to grasp a new thought. In other terms we are now allowed to have an editable reference list (of information) within a form.
Now we will from the users view point. For my example I consider an entity called “office” which got a subgrid of designations. Designation is another entity.
1) Office has no relationship with designation
When you select the subgrid/ sub record relevant ribbon button offers you buttons to do all the operations of designation entity such as Add new, Edit and Delete. Here I don’t need to show any link to designation from anywhere else of the CRM since I am capable of handling it from the subgrid.
2) Office has a 1:n relationship with designation
In this case we see an extra button called “Add existing designation” which leads to a wizard which gives full control of adding designations to the current subgrid.
3) Office has n:n relationship with designation
Now you don’t get add new button here but other buttons such as remove.
Subgrid is a nice improvement in CRM 2011, yet they are to be carefully selected in terms of the relationship type, as required. Also, by looking at the ribbon we can identify the entity relationship behind it.
It is useful to know how to implement a new group in the ribbon and also to put buttons inside it. Before starting to explain an example I am happy to remind you a basic rule again.
Ribbon modifications can be done in main three ways to distinguish how they should appear in to user. They can be explained as below;
Mscrm.Form.<entityname> – change appears when form is opened for selected record. Mscrm.HomepageGrid.<entityname> – change appears when grid is shown (multiple records) Mscrm.SubGrid.<entityname> - change appears when records appear within a subgid of some other entity OR appears in the result pane of the advanced find
OK, I am here going to do the sample for Subgrid (so my tag naming format will be like Mscrm.SubGrid.<entityname>). In my example I am going to consider a custom entity called new_insurance.
My scenario is to give few buttons to renew insurance. Here I am just implementing one button to create a quote, but I put it in a Group called “Renewal Methods” so I can have other optional buttons for the same need.
This is the main custom action tag. Noticeably, it contains a button tag as we already know. So we can have many as required.
<CustomActionId="Mscrm.SubGrid.new_insurance.RenewalGroup.CustomAction"Location="Mscrm.SubGrid.new_insurance.MainTab.Groups._children"Sequence="110"><CommandUIDefinition><GroupId="Mscrm.SubGrid.new_insurance.RenewalGroup.Group"Command="Mscrm.SubGrid.new_insurance.RenewalGroup.Command"Title="Subscription Renewal"Sequence="51"Template="Mscrm.Templates.Flexible2"><ControlsId="Mscrm.SubGrid.new_insurance.RenewalGroup.Controls"><ButtonId="B_CUSTOM_QuoteCreate"Command="Cmd_CUSTOM_QuoteCreate"LabelText="Create Quote"ToolTipTitle="Create Quotes"ToolTipDescription="Create quotes for renewal subscriptions"TemplateAlias="o1"Image16by16="/_imgs/SFA/ReviseQuote_16.png"Image32by32="/_imgs/SFA/ReviseQuote_32.png"/></Controls></Group></CommandUIDefinition></CustomAction>
Now we need to add two more custom action tags to define the appearance of the group we are introducing here.
Then we define a command definition, actually without any rule since group is to be just viewed. Finally we have an enable rule for the button which is quote smart. In fact, button get enabled only when at least one records selected and not more than 20 records selected. We change this as required.
Dialogs are initially introduced to use through a given button and select one from the list in the resulted pop-up page. I think it could be used to get executed in different form events. Typically, when change a drop down, system can prompt a Dialog to get some responses related to that action which will do some other operation.
We can execute Dialog from any action. Check the method I use for this;
function launchDialog(_dID, _eName, _rId)
{
var sUri = Mscrm.CrmUri.create('/cs/dialog/rundialog.aspx');
window.open(sUri +'?DialogId='+ _dID +'&EntityName='+ _eName +'&ObjectId='+ _rId, null, 'width=615,height=480,resizable=1,status=1,scrollbars=1');
}
We need to pass three parameters here. Check the calling part as below;
var _workflowid ='f2057c43-0670-4384-93d4-ac6147611c98';
var _onjecttype ='new_insurance';
var _instanceid = crmForm.ObjectId;
launchModelDialog(_workflowid, _onjecttype, _instanceid);
Though other two parameters are familiar, not workflow id. Ok now this is the way of obtaining it;
- Import the customization of the Dialog
- Open the customization file
- Search for word “Workflow”
You will see this kind of section which gives you the workflow id.
Caution 1) Be careful when deploying the since Guid of the workflow is different in different environments. So you have to change it accordingly.
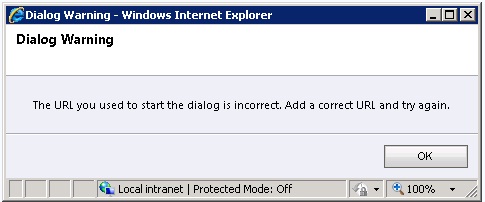
2) One could feel like using a Dialog for an operation which has nothing to do with individual record (record instance). In such occasions, though it is logical to think not to pass any value for instance id, it is a must to pass one. If you don’t pass, Dialog will not pop-up as expected, but below message will be thrown.
Conceptually, Dialog is always defined against an individual record.
Filtered lookup in CRM 2011 is quite different than CRM 4.0. It contains more code, but result could be fruitful. I learn this as a different approach. This actually is imposing of a custom view which is temporary and dynamic. I like the idea. “addCustomView” is the method that enables us to do this. We will see how I do this.
Assume I have a custom entity called office. My office entity contains two main lookups. One is for account and other one is for contact. Obviously, I need to have a filter for contact lookup which will show only the contacts of selected account (if account lookup field is not null). In this approach, we are just creating a view and make it default when loading the lookup window.
Below is the method I use for this. This code shows you how it gives more control over the new view... we decide its name, criteria and also layouts that contains the widths of each column to show. Guid is any new Guid.
Here is the code to call this from the loading event.
function office_OnLoad()
{
var attrs = Xrm.Page.data.entity.attributes;
if (attrs.get("office_accountid").getValue() !=null)
{
var _aid =attrs.get("office_accountid").getValue()[0].id;
var _aname =attrs.get("office_accountid").getValue()[0].name;
ContactLookupFilter(_aid, _aname);
}
}
Are we done now? Some explained this is it, but I propose you to call this method from the OnChange event of the account lookup as well. Let me explain why? If we call this method only in loading, this custom view will load for the contacts of account which is currently assigned to the form. If user changes the account (and not save yet) prior to filling the contact lookup, our view is still showing the contacts of the account which was present when loading. But now we got different account on the form... Hope you understand the scenario...
Now check how its look likes... Can you see how our new view have got the custom name we gave. Very descriptive; since we have selected “SO and Company” as the account, we can see that as a part of the view name.
See how this dynamic view is listed along with other views that give the flexibility of selection.
I have shown in my previous post how to enable/disable a ribbon button according to defined criteria. Assume that we need to make it visible/invisible depending on the same rule. This is also possible with a little change of XML. Get defined our own display rule instead of enable rule. Define and call under Displayrules tag instead of Enablerules tag. Please check below code. (Please refer previous post for relevant CustomActions tag entry.)
We have discussed how to add custom buttons to ribbons in a recent post. We have used standard Enablerules for them. Enablerules are to define criteria when to enable/disable our button. If we discuss a real time scenario, I need to enable a button in account form ribbon when account is a company. Here, account can be an individual or a company, which decides by the value of one option list. We will first see the CustomActions and CommandDefinitions entries, which are familiar already.
<CustomActions><CustomActionId="CA_CUSTOM_CompanyFunction"Location="Mscrm.Form.account.MainTab.Save.Controls._children"Sequence="35"><CommandUIDefinition><ButtonId="B_CUSTOM_CompanyFunction"Command="Cmd_CUSTOM_CompanyFunction"LabelText="Company Matters"ToolTipTitle="Company related Matters"ToolTipDescription="This calculate and gives you the company related information"TemplateAlias="o1"Image16by16="/_imgs/SFA/calculate_16.png"Image32by32="/_imgs/ribbon/calculate32.png"/></CommandUIDefinition></CustomAction></CustomActions><CommandDefinitions><CommandDefinitionId="Cmd_CUSTOM_CompanyFunction"><EnableRules><EnableRuleId="ER_CUSTOM_CompanyCustomer"/></EnableRules><DisplayRules><DisplayRuleId="Mscrm.CanSaveAndClosePrimaryEntityType"/></DisplayRules><Actions/></CommandDefinition></CommandDefinitions>
Now, take a close look at the enable rule ER_CUSTOM_CompanyCustomer which is defined by me. This is to be defined with our criteria. Interesting part of ribbon is that I can define those in a special section called <RuleDefinitions>. Under this tag, we can see two sections to define two kinds of rules. Namely Display rules and Enable rules. See carefully, how I have defined my enable rule there.
Scenario: It is required to calculate the cost in opportunity. Usually, opportunity consists of Recalculation button to calculate few values, but not cost as I need. First I tried to find a way to fire my own JavaScript to do that with the same button, but I learned it is not a recommended attempt. So now I am trying to implement my own Button to do all the calculations (my way) and hide the existing calculation buttons.
To add/ Hide buttons I need to modify the ribbon. In order to modify the ribbon it is needed to import the customization of particular entity. For clarity I will mention below steps;
Create solution and add only the entity we need to modify the ribbon.
Export it (Don’t add any other depending objects/ export as unmanaged solution)
Unzip the file (it will give three XML files)
Modify the customizations.xml file accordingly (which we will discuss)
Zip the files again
Import the file and publish
To play around with Ribbon, there are some resources to be referred. SDK has provided a XML file for each entity in sdk\resources\exportedribbonxml folder. For my example with opportunity, I can open opportunityribbon.xml. So practically, we need to open two XML files when we need to modify a ribbon.
Costomization.xml (TO MODIFY)
<entityname>ribbon.xml (TO REFER)
Reference file contains all the information about existing buttons, locations and their characteristics such as abilities and visibility. First we will hide the existing Recalculate buttons. When I simply search the reference file I found two button Ids for this (Mscrm.Form.opportunity.Recalculate, Mscrm.HomepageGrid.opportunity.Recalculate).
Buttons can be placed in three main ways in ribbon.
Mscrm.Form.<entityname>– button appears when form is opened for selected record. Mscrm.HomepageGrid.<entityname> – button appears when grid is shown (multiple records) Mscrm.SubGrid.<entityname> - Button appears when records appear within a subgid of some other entity
Now adding below entries within the <CustomActions> tag will do the hiding of both Recalculate buttons.
Now I am trying to add my own button with instructions to fire my javascript method. Add below entry within <CustomActions> and <CommandDefinitions> tags respectively.
<CustomActionId="CA_CUSTOM_Recalculation"Location="Mscrm.Form.opportunity.MainTab.Actions.Controls._children"Sequence="8"><CommandUIDefinition><ButtonId="B_CUSTOM_Recalculation"Command="Cmd_CUSTOM_Recalculation"LabelText="Recalculate Job"ToolTipTitle="Recalculate Totals, Costs and Margin"ToolTipDescription="This recalculates Job Price, Job Cost and Job Margin"TemplateAlias="o1"Image16by16="/_imgs/SFA/Recalculate_16.png"Image32by32="/_imgs/ribbon/recalculateopportunity32.png"/></CommandUIDefinition></CustomAction><CommandDefinitionId="Cmd_CUSTOM_Recalculation"><EnableRules><EnableRuleId="Mscrm.CanWritePrimary"/><EnableRuleId="Mscrm.OpportunityIsOpen"/></EnableRules><DisplayRules><DisplayRuleId="Mscrm.CanWriteOpportunity"/></DisplayRules><Actions><JavaScriptFunctionLibrary="$webresource:new_recalculations.js"FunctionName="JobCalculationSinglejob"></JavaScriptFunction></Actions></CommandDefinition>
Here CustomAction Id and Button Id are a two unique values I gave to my Custom Action and Button respectively. If you look carefully, it’s noticeable that I have given a command name and use that when I define the command later on. Though location value is bit tricky, I have checked the reference file and found the location of the existing recalculate buttons for that. “_children” postfix is to tell that button should come under that. Sequence number is a number to arrange the buttons with the existing buttons. Other buttons in same location were having numbers 5, 6 and 7 and I wanted to add my one at the end, which I put 8.
Command definition is used to define the behaviour of my button and it’s obvious to see how it calls a method within the JavaScript which has been saved as a webresource. Also I have done a cunning work here. Since I am going to perform a calculation, I copied (from reference file) the enablerules and displayrules from the rules of existing recalculation button. So my button will behave the same way.
Now I am free to do calculation within my Javascript method with my own rules!
I recently found some tricky fields in CRM 4.0 that could make developer’s life bad. I found this in Lead entity, but this issue could be applicable for some other entities. Anyway this has nothing to do with custom entities.
If you see the address fields of Lead, you will be able to find some fields such as Address1_line1, Address1_city, Address2_line1, Address2_City2 and etc. If you go to customization area you can increase the maximum length of those fields. Unfortunately, publishing too is possible.
Since it is publishable one can think, everything is fine, but still actually field length is not changed. Tricky part is you may be able to create records sometimes, but when you try to create record with long data for those fields you will get an error.
Anyway, reason for this issue is, CRM is keeping those data in a separate table, which is not being modified through usual customization process. (I guess) Check the way, actual address fields of Lead are kept in a different table. It shows the actual maximum lengths you can go for. This is bit misleading since you are allowed to publish the entity after changing those fields.
I wonder if anyone has tried changing those database fields outside the CRM.
You are always recommended to determine all your relationships in between the entities prior to implementation of CRM. Anyhow, when it comes to practice you will face a lot of exceptions. In most cases Customer/Business analyst could have a need to change certain relationships due to change of requirements. One common change would be to have a need of a many-to-many relationship instead one many –to-one.
Will take a scenario; If a contact can participate in an event, simply we would create a n:1 relationship in contact. In fact, one can simply fill the lookup shown in the contact form. In the db, you will have an extra field to hold the relevant event id (i.e. new_eventcontactid) in contact enity.
Now, if it is required that contact to be able to participate for more than one event, current solution is not suitable. Then you will be asked to convert current relationship to a n:n relationship. How you do it without losing the data?
Create an n:n relationship in between Contact and Event (actually new_event). If the relationship name is new_event_project, you will find a table in the SQL with the same name that holds the relationships. Actually the primary keys of the related entity instances. Now you will need to fill this tables with the data in previous n:1 table as below t-sql script does.
insertinto new_event_project (new_contact_eventid,contactid,new_eventid)
select NEWID(),ContactId,new_eventcontactid
from contact
where new_eventcontactid isnotnull
Now you can delete the n:1 relationship in contact entity.
In my previous post (read), I suggested a method to execute a JavaScript for completion of an appointment. This method works fine, but not for one instance. If you carefully watch the tool bar of an appointment, you will notice a button for “Save as Completed”. This is a fast way of completing the appointment. Our previous method doesn’t fire for this click since event.Mode is not 5 for this, but 58.
For completion of the Appointment, We need to modify the code as below, which will work for both menu and button.
var _eventMode = event.Mode;
    if (_eventMode == 5)
    {
        var _status = document.getElementById('newStatusCode').value;
    }

    if ((_eventMode == 58) || ((_eventMode == 5) && (_status == 3)))
    {
       //code to work when completing
    }
In some business logics, it is required occurring some steps when an Appointment is closed. When I started coding it, to trigger a JavaScript, I made it happen in “onSave” event as usual. Eventually I found that it is needed to check exactly what the mode of “close Appointment”. Actually closing is the deactivating the record as we understand in CRM terms. So I could simply check relevant mode (i.e. 5). Then only I understood that I need more checking before proceeding. Not like any other entity, Appointment has another option of cancelling while closing. See below menu;
Hm... It’s obvious that you need to do your task only when completing, not cancelling. Here, trick is, you need to check “newStatusCode” code for that. That’s how you need to distinguish two cases. Below code will explain it well;
if (event.Mode == 5) //Deactivate Mode
{
   var status = document.getElementById('newStatusCode').value;

   if (status == 3) //Status for Completed
   {

   }
   if (status == 4) //Status for Cancel
   {

   }
}
I needed to remove the deactivation option from the Account entity. So I actually have to remove this from two separate menus. One is "More Action" section of the account grid. Other one is "Action" section appeared once account record is opened.
Removing items from Action menu of the grid is tricky, because we don’t know from where we can call a JavaScript to accomplish our task. After reading and researching I managed to solve this by calling a javaScript from the loading script in below page.
What is really cool here is, you have typecode in hand for your coding. Since I am interested in account entity, I checked its typecode (i.e. 1) and proceeded with my code. Id of the menu item relevant for deactivation was found through Developer Tools (pressing F12 as usual).
functionwindow.onload()
{
...
...
if (_currentTypeCode==1)
{
if (document.all._MIdoActioncrmGrid1deactivate != null)
{ document.all._MIdoActioncrmGrid1deactivate.style.display = "none";}
}
..
}
This seems cool, yet not supported at all.. So please play safely and carefully.
This is simple trick that could improve the usability of a CRM application. Let me explain the requirement first. For example, we might need to add a potential customer to an entity main form. Also we might need to add a contact to the same form. In this case, most practical requirement is to show the contacts relevant to the selected customer.
Please use this function in onload of the form.
FilterLookupUponParent = function(source, target)
{
if (IsNull(source) || IsNull(target)) { return; }
var name = IsNull(source.DataValue) ? '' : source.DataValue[0].name;
target.additionalparams = 'search=' + name;
}
Use this code to call the function, passing the form field names.
Here it is illustrated that, RAW Ltd has two contacts.
Once we use above code, when clicking the lookup field will pop up the lookup window only with those contacts that are relevant to the selected RAW Ltd. This is actually a filter. Once you release the filter, you get all the contacts.
Actually, it is also wise to call the same method is onChange event of the customer, because filter should get changed accordingly.
This is something you don’t see usually in Dynamics CRM 4.0. According to picture, it shows two default public view, which is against the norms. Surprisingly, this can happen rarely in CRM systems. This is unexplained.
What you have to do is, export the customization of particular entity and check for sections related to public views (Here I am strictly calling “Public” views; I want you to omit the Associate views, advanced find views and etc.) and find <isdefault name="Yes">1</isdefault> tag. You will find this for more than one Public View. You will have to change them to <isdefault name="No">0</isdefault>, except for the correct default public view.
Now import the customization and publish. You problem is solved.