Showing posts with label Logic App. Show all posts

Jul 15, 2026

Create Azure Logic Apps using Visual Studio Code

We usualy create Azure Logic Apps in Azure portal with all the drag and drop help. Still we can do it in Visual Studio Code which gives many benifits such as more control, testing, source controlling etc. Lets see how to achieve it step by step. 

1) Preparation of Visual Studio Code environement

Before starting, make sure we have below Extensions installed in Visual Studio Code.

(Note: Visual Studio Code may take bit more time to validate and enable extensions. If your expected menu/ command is not available, may be you need to give bit of time.)


2) Create Logic App 

Go to Workspace under azure and select Create new logic app workspace.


Then project will alow you to provide path name and below details.

Its important to select below settings for this excersise. (Logic App type = Logic App (standerd) and Workflow Type = Stateful)


You may see below project is now created and folder structure as below.

Now Convert Logic App to NuGet based logic app project.


Now Open workflow.json file in designer.


Here you will need to select Use connecters from Azure option, Resource Group etc.

Now you are good to create a simple Logic App for testing purpose with familiar components. Here I have added below actions. Added sample json to Compose component and modified Response component to read output of Compose component.


This may also ask you to login to your Azure subscription.

3) Test locally

Now go to Run in editor and start Run / Debug.


After run right click workflow.json and select Overview to get the URL as below.

Now try this url in Postman to see the result which is the sample json we passed.


Also its possible to click Run History and get visual execution session diagram as normal Logic App. (this looks same for Power Automates too)

4) Publish in Azure

If satisfied with testing, its time to deploy. Select Deploy to Logic app from the menu appear when right click the logicApp.


It will also ask few settings on Publishing in Azure and most of them are self-explanatory.

Once done, you will see newly deployed Logic App in Azure Portal.

5) Test Published App

Now, under workflow, you will see new workflow we designed with sample json, ready to be run.

Run will show us the json as the Response Body which is a proof our logic app is running successfully.


(Ref: https://www.youtube.com/watch?v=ZOeTtgifIP4&t=306s)

Oct 9, 2017

Synchronize Contacts to a Table Using Azure Logic Apps

I have suggested few ways of getting free Azure Subscriptions for Dynamics 365 developers through a post. Click here to read that.

Now though of jumping in to Azure Logic Apps, among many new Dynamics 365 + Azure technologies.

Azure Logic Apps come in handy in integrating Dynamics 365 with many third-party applications. Anyway, most fundamental requirement could be to synchronize an entity data with a SQL database. Below step-by-step guide is to illustrate how we can achieve this in a simple manner.

Let’s open a logic app in Azure. Click New, Select Web + Mobile and select Logic App.


 Now give a meaningful name to the Logic App and Create a Resource group or select existing one.


Then you will come to Logic App Designer with all kinds of Templates. Still I prefer to use a Blank Template for the sake of learning and flexibility. Click Blank Template and select Dynamics 365 as the Connector as below.


Within many triggers, select Dynamics 365 – When record is created or updated as the trigger.


Obviously, you need to provide your Dynamics 365 Organization and Entity interested in synchronizing. In my scenario, it’s Contact.


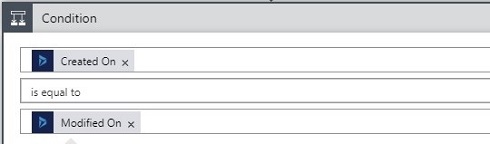
Now add the Condition which does the trick. In Dynamics 365, we have selected the trigger which tracks both Create and Update operations. You may notice we don’t have such single operation in SQL. Our approach is to check if Created on equals Modified On. If Condition satisfies, it’s a Create or else an Update.


Now add SQL server Insert row action if condition is satisfied and match the table fields with Dynamics 365 fields as below. I have selected only few fields here, but it’s essential to map Id column so Dynamics and SQL table record can be mapped for Update Operation.


Now add SQL server Update row action if condition is NOT satisfied and match the table fields with Dynamics 365 fields as below. You will notice we have extra field called Row id here which is nothing but the Primary Key. This is obviously necessary for Updating.


Now run the logic App and try the operation.

I created Contact record for Mark Wilkinson, and I got below record created through Logic App. App identified this as a Create operation since both Created On and Modified On values are same.


Then I changed the Description field and found it’s correctly updating the record as below.


This is just simple explanation, but this is evident Logic Apps can be used to synchronize Dynamics 365 data with SQL tables easily.