Click here to check the steps of creation of the Flow, which is utilised in this exercise.
PowerApps are meant to be catered for one simple operation, especially when it should be separated and easy to be handled by a user. Other advantage is PowerApp user doesn’t need to know how to use Dynamics 365. For example, this app enables a sales person to add a Contact for a given Account very quickly, may be while in the field.
Login to PowerApps in https://powerapps.microsoft.com and start new PowerApp with Dynamics 365 Phone Layout.
Select Data Table as Accounts to have a basic App that allows your to Read and Edit Accounts. This is auto-generated.
Let’s start steps to enhance this basic app to address our need;
1) Add a New Screen Called AddContactScreen.
2) Add the Home icon to browse back to Main screen.
3) Now add Person sign to Home Screen that enables browsing to our new Screen. Now our browsing in between screens are functional.
4) Add a new Form to our new screen (i.e. AddContactScreen) with two Data cards for Account Name and Id.
Make sure selected Item is set as below for the Form. This helps us see which Account we selected and Id is available within new Form to proceed with next steps.
Also, make Id invisible.
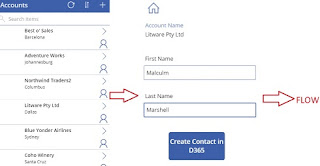
5) Now add 2 labels and 2 Input Texts for First Name and Last Name followed by a Button (i.e. Create Contact in D365)for submission. Now our components should be looked like below;
6) Select Button, go to Action Tab, Select Flow, which enables selecting any Flows we have. (Creating the relevant Flow for this exercise in detailed here)
Now pass the parameters to Flow as below and navigate back to the Home.
7) Let’s check how this work.
Here we got the new Contact created in Dynamics 365.
Very good example on Canvas App : https://docs.microsoft.com/en-us/powerapps/maker/canvas-apps/data-platform-create-app-scratch


No comments:
Post a Comment