May 20, 2018

Filtered Lookup for Customer type fields

I shared a code snipped for a filtered lookup here. When it comes to Customer Type lookup, it is bit more complex than a usual Lookup. Let's have a look;

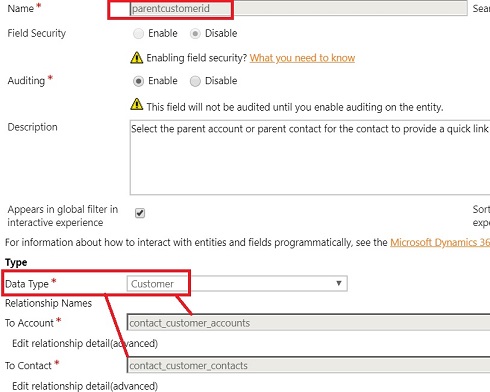
Consider parentcustomerid field of Contact. Though it is a lookup, it is a Customer type lookup. Usually a lookup refers another Entity Type; Customer Type refers two types, namely Account and Contact Entities. If you Open this field’s customisation, you will see below details on two different relationships.


Now suppose I need to filter this loop to show only Accounts of only one Business Types (say BusinessTypecode = 1 for example). We may think of implementing below code.

AccountFilter: function () {
var accFilter = 
"<filter type='and'>
   <condition attribute='businesstypecode' operator='eq' value='1' />
</filter>";
Xrm.Page.getControl("parentcustomerid").addCustomFilter(accFilter,"accdount");
}

//Calling
Xrm.Page.getControl("parentcustomerid").addPreSearch(AccountFilter);

Then you will realise, this is half the solution. Though this filters Accounts correctly, Contacts are Not filtered at all. In fact, we need to filter-out all the contacts as below.

ContactFilter: function () {
var conFilter = 
"<filter type='and'>
   <condition attribute='lastname' operator='eq' value='' />
</filter>";
Xrm.Page.getControl("parentcustomerid").addCustomFilter(conFilter, "contact");
}

//Calling
Xrm.Page.getControl("parentcustomerid").addPreSearch(ContactFilter);

Now we have tried to filter Contacts with null last name. Since Last name is mandatory there are no contacts with null Last name, resulting None of the Contacts are shown for Lookup.

This solves the problem. When you need to filter RegardingObject of Activities, you may need to implement many filtering criteria just like this.

One other thing to keep in mind is, same way we use addPreSearch(), we also can removePreSearch() extension as necessary.

May 9, 2018

PowerApp to Add New Contacts to Accounts

Click here to check the steps of creation of the Flow, which is utilised in this exercise.

PowerApps are meant to be catered for one simple operation, especially when it should be separated and easy to be handled by a user. Other advantage is PowerApp user doesn’t need to know how to use Dynamics 365. For example, this app enables a sales person to add a Contact for a given Account very quickly, may be while in the field.

Login to PowerApps in https://powerapps.microsoft.com and start new PowerApp with Dynamics 365 Phone Layout.


Select Data Table as Accounts to have a basic App that allows your to Read and Edit Accounts. This is auto-generated.


Let’s start steps to enhance this basic app to address our need;

1) Add a New Screen Called AddContactScreen.


2) Add the Home icon to browse back to Main screen.


3) Now add Person sign to Home Screen that enables browsing to our new Screen. Now our browsing in between screens are functional.


4) Add a new Form to our new screen (i.e. AddContactScreen)  with two Data cards for Account Name and Id.


Make sure selected Item is set as below for the Form. This helps us see which Account we selected and Id is available within new Form to proceed with next steps.


Also, make Id invisible.

5) Now add 2 labels and 2 Input Texts for First Name and Last Name followed by a Button (i.e. Create Contact in D365)for submission. Now our components should be looked like below;


6) Select Button, go to Action Tab, Select Flow, which enables selecting any Flows we have. (Creating the relevant Flow for this exercise in detailed here)


Now pass the parameters to Flow as below and navigate back to the Home.


7) Let’s check how this work.


Here we got the new Contact created in Dynamics 365.


Very good example on Canvas App : https://docs.microsoft.com/en-us/powerapps/maker/canvas-apps/data-platform-create-app-scratch

A simple Flow to create a Contact for existing Account

This Flow itself doesn’t seems to make any sense, but my plan is to call this through a PowerApp. Click here for PowerApp steps. Below steps illustrate some generic approach for a simple Flow operation.

1) Browse to https://flow.microsoft.com and sign-in. Though, there are many templates, I would like to start a Blank Flow for our simple operation.


2) Since we are planning to call this Flow from a PowerApp, select PowerApp as the starting trigger.


3) Now we need to Define three String Variables for First Name, Last Name and Company Name.

a. First Select Variable type from Action list.


b. Now select Initialize Variable action.


c. When initializing the Variable, for Value select Select In PowerApps comes under Add Dynamic Content.


d. Make sure we create String type variable for Account Id as well. (Remember, we plan to call this Flow from a PowerApp which will pass a Guid)


4) Create Contact Record

a. Select Create record in Dynamics 365 action.


b. Now select you D365 instance and entity which is Contact.

c. Now Assign the variable values as appropriate. You will notice we have mapped value for extra field, Company Name Type as Accounts. This is because this Lookup can have both Account and Contact values. This type declaration is important when creating Activities with regarding Id where type can be varied.


5) Now check the final product, execute and see.

This is how our Flow should look like at last.