Oct 11, 2018

Relationship Insights in Dynamics 365

It is interesting to see how intelligent components come in to play in Dynamics 365. Let’s have a look at Relationship Insights which is a key set of features within Embedded Intelligence suite. Embedded Intelligence suite analyses Dynamics 365 Data as well as Microsoft Exchange database to produce constructive insights to understand relationships through behavior of relationships.


As illustrated, Relationship Insights consist of three separate solutions; namely Relationship Assistant, Email Engagement and Auto Capture. Let’s have a close look at each and how they help end user. (Note: Sales Insights Add-on is not discussed in this post)

Enable Embedded Intelligence

Go to Settings > Intelligence Configuration and enable EI by Accepting the Privacy note.


It is important to understand that features we are going to work with would track behavior and collect data about clients. In fact, you got to be careful in making sure you are not violating privacy policies of the organization.
Let’s have a quick look on three separate Solutions provided by Relationship Insight.

A. Relationship Assistant 

As illustrated in first diagram, Relationship Assistant require configuration of Action Cards. An Action Card represents one reminder tile user will be shown. They are categorized as Base Cards and Advance Cards. Advance Cards are further sub-categorized.


One example of an Action Card would be a No Activity about an Opportunity for last 30 days. Also, it can be as simple as a reminder for an important meeting. These Cards are globally enabled by Administrator through the Embedded Intelligence configuration page, but Users can re-configure from personal level based on their choice.

As per the configuration, Cards are shown timely in the front end so that User is helped in taking necessary steps. 


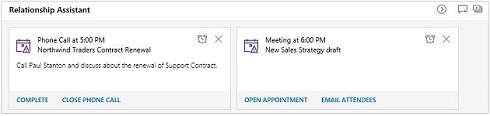
For example, above two Cards are to remind a Phone Call and Appointment scheduled for today. Please notice different actions provided in each Card based on type. For Appointment, its handy to have the option to Email all the attendees at once or modify the Appointment.  

B. Email Engagement

As soon as Email Engagement is enabled, User can use below list of rich features, otherwise possible only through third party add-ons such as ClickDimensions. 


  • Review the full interaction history of the message.
  • See when recipients opened your message, clicked a link, opened an attachment, or sent a reply.
  • Receive an alert right away, the first time a recipient opens your message.
  • Schedule the most effective delivery time and receive advice for the best time based on the recipient's time zone.
  • Choose the most effective message template, with recommendations based on your organization's previous email interaction history.
  • Set an alert to remind you when it's time to follow up on an email message.

C. Auto Capture

Auto Capture feature access your Microsoft Exchange (Server-Side sync should have been configured) and display Emails those are not necessarily Tracked in Dynamics 365, but likely to be related to important types like Opportunity, Lead etc. 

Please check below screen shot of the Activities Tab which shows list of Emails including one un-tracked Email. This Email subject is same as one of the Opportunity’s topic in the System. In fact, Auto Capture suggest this Email could be related to that opportunity. So, it states clearly that item is not Tracked, but has provided the option to Track. Once Track is clicked, it will create related record in Dynamics 365 which is visible to all. Importantly, till then, it is only visible to the owner of the record to decide whether to Track or Not.


As other features explained here, this feature too needs to be globally enabled first by the administrator. Yet, individual users can switch on/off in user level. 

In summary, Embedded Intelligence is a promising futuristic approach to improve user-friendliness and enhance functionalities through insights in Dynamics 365. Relationship Insight, at this early stage, already highlights what value it can leverage to a day to day business activities through intelligent analysis of relationships.

Jul 19, 2018

Things to consider when resetting a Dynamics 365 instance

Resetting of a Dynamics 365 instance is not a big deal since we are helped to do that through the Admin panel. If you need to do it for Production instance, first you need to convert it to a Sandbox instance which is again not difficult.

This is a well-illustrated article on how to do it step-by-step.


Anyway, Resetting of an instance may be needed due to many reasons such as need for an vanilla instance, changing the region and base currency, getting rid of some customization and etc.

Anyway, depending on the case there are few more things to consider prior to resting which I though of mentioning.

1) Do you need some of the customisation to be installed after resetting ?

If we need some of the solutions to be imported after resetting, you of course need to take those back-ups. More than that I would suggest, importing it back to another similar vanilla environment first to check if it works and keep that environment as a back-up. 

So we have two back-ups; 
  • Solution File 
  • Another D365 instance with those customisation.

2) Do you need some of the reference data to be ready after resetting ?

Sometime creating some sample data could be time consuming. In such cases, its best to use Configuration Migration Tool to backup some of those data, to be imported after the reset.

Business Unit is one of the tricky entity you necessarily need to consider.

3) Do you need your existing Theme back ?

Keep in mind, Theme is not imported through Solutions, in fact, you need a plan on how to restore the Theme. Probably it could be manual work. (Though I haven't tried, I found this article on importing Themes.)

4) How it impacts Integration ?

Finally, just think of the impact on Integration, especially, if it depends on hard-coded unique identifiers of any records. (#2 assures reinstalling same Id's)


Jul 2, 2018

Pass Dynamics 365 execution context to ASB (TwoWay), use Listner and retrieve back via Azure Aware Plug-in

Last time we understood how to pass the Dynamics 365 Plug-in context to Azure Service Bus without a Queue, but with a Listener. Let's extend our experience by using a TwoWay Designation type and Azure Aware Plug-in to retrieve contact back from end-point.

a) Register TwoWay Endpoint

As we did many times, Copy the Connection String from Policy of Azure Service Bus.


Now copy in the Service End Point entry of Plug-in Registration Tool.


In resulting detail page, change do below changes;
a. Select TwoWay for the Designation Type
b. Add https: to Namespace Address
c. Give a name to Path.


b) Implement Listener

Now implement below Listener code in new Console Application.

Need to install below Nuget Packages;
a. Microsoft.Crm.Sdk.CoreAssemblies
b. WindowsAzure.ServiceBus

using System;
using System.Collections.Generic;
using System.Linq;
using System.Text;
using System.Threading.Tasks;
using Microsoft.Xrm.Sdk;
using Microsoft.ServiceBus.Messaging;
using System.Runtime.Remoting.Contexts;
using System.ServiceModel;
using Microsoft.ServiceBus;

namespace AsbListnerTwoWay
{
    class Program
    {
        static void Main(string[] args)
        {
            string asbAccessKeyName = "Sum1ServiceBusPolicy";
            string asbAccessKey = "7WxSLRMvYF0A3HbLUgfQeqIEb1eKsHgg5mrUwc=";
            string asbEndPoint = "https://sumeservicebus1.servicebus.windows.net";

            var serviceHost = new ServiceHost(typeof(TwoWayServiceEndpoint));
            var transportClient = new TransportClientEndpointBehavior(TokenProvider.CreateSharedAccessSignatureTokenProvider(asbAccessKeyName, asbAccessKey));
            serviceHost.AddServiceEndpoint(typeof(ITwoWayServiceEndpointPlugin), new WS2007HttpRelayBinding(), asbEndPoint).EndpointBehaviors.Add(transportClient);
            serviceHost.Open();
            Console.ReadLine();
        }
    }

    public class TwoWayServiceEndpoint : ITwoWayServiceEndpointPlugin
    {
        string ITwoWayServiceEndpointPlugin.Execute(RemoteExecutionContext executionContext)
        {
            string message = executionContext.PrimaryEntityId.ToString();
            Console.WriteLine("Record Id : {0}", message);
            return message;
        }
    }
}

c) Implement Azure Aware Plug-in

Now read Service End Point Id by going to properties of the entry we created in first step as below;


..and implement a Plug-code (for Account Post Create). This code consist of Service End Point reference which uses the Id we read above.

using System;
using Microsoft.Xrm.Sdk;

namespace SumeTrial3Plugin
{
    public class AccountPostCreate : IPlugin
    {
        public void Execute(IServiceProvider serviceProvider)
        {
            Guid serviceEndPointId = new Guid("63c5c746-e07d-e811-a967-000d3ad1c0d2");
            IPluginExecutionContext pluginContext = 
                (IPluginExecutionContext)serviceProvider.GetService(typeof(IPluginExecutionContext));
            ITracingService tracingService = (ITracingService)serviceProvider.GetService(typeof(ITracingService));
            IServiceEndpointNotificationService service = 
                (IServiceEndpointNotificationService)serviceProvider.GetService(typeof(IServiceEndpointNotificationService));

            try
            {
                tracingService.Trace("Passing Context to Service Endpoint");
                string response = service.Execute(new EntityReference("serviceendpoint",serviceEndPointId), pluginContext);
                if (!String.IsNullOrEmpty(response))
                {
                    tracingService.Trace("response : {0}", response);
                }
                tracingService.Trace("Plug-in completed");
            }

            catch (Exception ex)
            {
                tracingService.Trace("Error: {0}", ex.Message);
                throw;
            }
        }
    }
}

Then register this plug-in as usual through Plug-in registration tool.


d) Test the operation

Now execute the Console Application (Listener) and Create an Account in Dynamics 365. You will notice below two;

1) Console Application/ Listener program pics the Context and write the Id.


2) If you check, Plug-in Trace Log, you will see the response has been retrieved by the Plug-in back.


Jun 29, 2018

Pass Dynamics 365 execution context to Azure Service Bus (OneWay) and read through Console Application (Listener)

In previous post, we understood how to pass the Dynamics 365 execution context to Azure Service Bus Queue and read through a Console App. Lets see how to pass the execution context to be read through a Listener bind to the endpoint. Here we don't use a Queue. (In our previous post we have also shown how to configure ASB from scratch).

1) Create a Service Policy in ASB

This time create a Shared Access Policy for Azure Service Bus in root level.


Once created, we can see all the details once open it. Copy Primary Connection String of the Policy.


2) Register Service End Point

Now Open the Plug-in Registration Tool and go to Register > New Service Endpoint which results a pop-up. Now paste the Primary Connection String we copied in previous step.


Now do below changes in resulting Service Endpoint entry;

a. Select OneWay for the Designation Type
b. Add https: to Namespace Address
c. Give a name to Path.


Now register a step for Lead entity for Create message. Make sure you register this in Asynchronous mode.


Now go to D365 and create a Lead record and check System Jobs, where you will notice an exception since there is no listener for endpoint as below;


3) Implement Listener to Endpoint

Let's implement a listener for the endpoint through a Console Application.

For that below NuGet Packages needed to be installed;
a. Microsoft.Crm.Sdk.CoreAssemblies
b. WindowsAzure.ServiceBus

Also notice that we have used Policy Name and Key (i.e. Primary Key) from the Policy we created.

using System;
using System.Collections.Generic;
using System.Linq;
using System.Text;
using System.Threading.Tasks;
using Microsoft.Xrm.Sdk;
using Microsoft.ServiceBus.Messaging;
using System.Runtime.Remoting.Contexts;
using System.ServiceModel;
using Microsoft.ServiceBus;

namespace AzureServiceBusListener
{
    class Program 
    {
        static void Main(string[] args)
        {
            string asbAccessKeyName = "Sum1ServiceBusPolicy";
            string asbAccessKey = "7WxSLRMvYF0myA3HbLUgfQeqIEb1eKsHgg5mrUwc=";
            string asbEndPoint = "https://sumeservicebus1.servicebus.windows.net";

            var serviceHost = new ServiceHost(typeof(TestRemoteService));
            var transportClient = new TransportClientEndpointBehavior(
                TokenProvider.CreateSharedAccessSignatureTokenProvider(asbAccessKeyName, asbAccessKey));
            serviceHost.AddServiceEndpoint(typeof(IServiceEndpointPlugin),
                new WS2007HttpRelayBinding(), asbEndPoint).EndpointBehaviors.Add(transportClient);
            serviceHost.Open();
            Console.ReadLine();
        }
    }

    public class TestRemoteService : IServiceEndpointPlugin
    {
        public void Execute(RemoteExecutionContext executionContext)
        {
            Console.WriteLine("Entity Name : {0}, Record Id : {1}", 
                executionContext.PrimaryEntityName, executionContext.PrimaryEntityId);
        }
    }
}

Now run this program and start Creating Leads. Now you will notice Listener is picking the context each time a new Lead is Created.


References;
https://blogs.msdn.microsoft.com/swetagu/2016/04/12/crm-azure-service-endpoint-and-listener-deep-dive/
https://nishantrana.me/2017/03/22/configure-dynamics-365-and-azure-service-bus-integration-using-oneway-relay-and-listener/
https://msdn.microsoft.com/en-us/library/gg334377.aspx

Jun 27, 2018

Pass Dynamics 365 execution context to Azure Service Bus Queue and Consume through a Console Application

This is the first exercise I performed to see how Dynamics 365 can be integrated with Azure Service Bus.

1) Configure Azure Service Bus and a Queue

Search for Azure Service Bus in Azure and create one. I have given below details. SumeRG1 is my existing Resource Group.


One its ready I would like to create a Queue by selecting it through menu items as below.


Below shows details I gave in in Queue.


Now I create a Shared Policy.


Once save the policy you will be able to see all the policy details including the Primary Connection String, which we need to copy.


2) Pass the context through

Now connect to your Dynamics 365 instance in Plug-in Registration Tool and go to Register > New Service Endpoint which result a dialog box. Now Paste the Primary Connection String we copied in previous step.


Then you will see how Service End Point Details get populated.


Now add a new step to newly registered Service End point entry in Plug-in Registration Tool. In my example I am adding Create Message of Contact.


Now Create a Contact in Dynamics 365 and notice one message has been pushed to d365azurequeue as below;


3) Consume the Queue Item through a Console Application

To consume the Queue Item I am creating a Console Application. Make sure you add below NuGet Packages to your application.


..and below is my code. Please note this Connection String is the same one we used to connect to Plug-in Registration Tool, which we copied from SAS Policy.

using System;
using System.Collections.Generic;
using System.Linq;
using System.Text;
using System.Threading.Tasks;
using Microsoft.ServiceBus.Messaging;
using Microsoft.Xrm.Sdk;
using System.Runtime.Remoting.Contexts;

namespace ReadAzureServiceBus
{
    class Program
    {
        static void Main(string[] args)
        {
            Console.WriteLine("Testing Azure Service Bus Queue Records pushed from D365");

            var connectionStr = "EntityPath=d365azurequeue;Endpoint=sb://sumeservicebus1.servicebus.windows.net/;SharedAccessKeyName=RootManageSharedAccessKey;SharedAccessKey=FcM+XYZSL7FOVIMXJIdg0Gk1uK3ipU51hUSrC50N4UyCTo=";

            var client = QueueClient.CreateFromConnectionString(connectionStr);

            client.OnMessage(message =>
            {
                var context = message.GetBody<RemoteExecutionContext>();
                Console.WriteLine("Entity Name : {0} and Id : {1} ", context.PrimaryEntityName, context.PrimaryEntityId);
            });
            
            Console.ReadLine();
        }
    }
}

Once execute I get below result as expected;


Interestingly, if you refresh the Queue in Azure Service Bus, we can see Queue Item has been consumed (i.e. removed).

This is actually the fundamental idea of using Azure Service Bus for integration of Dynamics 365 with third party applications. I find this cool ! You know why, not like many other integration techniques we use, here we can see message is being added to the queue and stay in waiting status to be consumed. In fact, this decoupling is significant and nothing get lost in thin air.

References;
https://community.dynamics.com/365/b/xrmandbeyond/archive/2017/11/11/message-queueing-in-dynamics-365-with-azure-service-bus
https://nishantrana.me/2017/03/22/configure-dynamics-365-and-azure-service-bus-integration-through-queue-and-queueclient/

Jun 17, 2018

Filtered Lookup in Resco Mobile App

We have talked about Lookup filters for Dynamics 365 web app for many occasions in this blog. Now we will see how to implement this in Resco Mobile app for Field Service. This customisation has to be done through Resco Woodford Solution Customisation application.

Suppose we have below related entities in our scenarios;


What this means is Locations are associated to Accounts. When we set a Location to an Asset we don’t need to see entire list of Locations, but can pick one from the list which are associated to the Account of the Asset. Now this is a typical candidate for a Filtered lookup.

This filtering needs two steps;

1) Create new Lookup view in Location Entity

Create a new View, in fact Clone from Default View. Then Rename the view name accordingly and select Lookup as type.  Check Hide in View Selector since we don’t need to list this as a view in usual browsing.


Now Click Edit filter and add Condition to set Account and click Set Variable which result you with a pop-up to set it. Now select Asset from the Variable Selector and set Account field within it. This is because we are planning to use this to filter by Account Id when we are in Asset Entity.


2) Set newly created Lookup view to Lookup field in Asset

Now go to Asset Entity and Open the form we need to set the filter. Add the Location field and Open the Properties. Then we have to set newly created Lookup as the Initial View by clicking relevant checkbox. Also we have the option to keep the other view or hide it by clicking the check of in the beginning of the row.


Now click Publish All and check the Mobile App after synchronising.


Jun 15, 2018

Track Field Technicians locations through Resco Mobile App

We are provided a very strong insight in to Scheduled Jobs’ location and Resource’s suggested path in Dynamics 365 Field Service Schedule Board. In fact, we can optimise the route, prioritise Bookings in terms of geographical location considering and travel time and etc. Anyway, how we going to track what Field Technicians’ real locations are?

Here I am going to explain how to do that.

1) Associate Google Map API Key to Woodford Solution

a. If you don’t have a Google Map API key, sign-up here and retrieve one. Once you register you get $300 worth credits free. It will ask for a credit card number for authenticity, just like in Azure registration, but nothing will be charged, without your consent after fully consumption of free credits.

b. Now go to Settings > Solutions and Open Resco MobileCRM Woodford solution and click Configuration. Then paste the key and save.


c. Now there is a way to check if Key is valid and correctly associated. Browse to Settings > MobileCRM > Mobile Auditing. Then click Mobile Auditing Map link. If a Map is loaded without any issue, everything is in order.


Otherwise you will get below error message.


2) Configure Map for Users

Now go to User Form Customisation and click Web Resource.


Allocate resco_MobileCRM/MapIframe.html web resource as shown below. Also make sure to click “Pass record object-type code and unique identifier as parameters” Then save and publish.


3) Check how its working

Now Browse to User Form of the Field Technician you want to track the location. You will see points within the map in newly added Iframe where User/ Field Technician performed any action with the Resco Mobile App as below.


Jun 7, 2018

Schedule Web Job with Azure Scheduler

In this example, I am using a console application since it’s easy to demonstrate. Below is the simple Console Application I am using.


Now publish the Console Application as a Azure Web Job.


Select Run on Demand as the run Mode.


Then select Microsoft Azure App Service as publish target.


Now select Subscription, Resource Group as View and existing App Service in next window.


Now validate the connection before publishing.


Now login to Azure (https://portal.azure.com/) subscription used to publish this app.
Now browse to App Service > Web Jobs where you will see the Web Job just published.


Here we able to Run and check the Logs, which will show the execution steps.


Here we see the text in log, we intended to write in our Console application.


Anyway, our plan is to schedule this execution. For that we need to go to Scheduler as below.


Once we press Create, resulting page requires a lot of details like Subscription, Job collection, Action Settings and Schedule data. One of the import detail is URL.


This is how you need to compile the URL;
Go to Properties of the Web Job and read these important parts and compile the URL as below format.


https://<B>:<C>@<A without "https://" part>

Once scheduler is enabled, you will see its recurring execution as expected.