Nov 4, 2022

First Cheat sheet and pitfalls of liquid

In Dynamics/ Power Platforms world, we use Liquid Templates along with JavaScript in Portal which is a great combination. A cool way to work with client side along with server side. This reminded me of my firsthand web development experience a long ago, using Classic Asp. 

Anyway, this combination is strong. We learned CRUD operations using Java Script in past post. When we use Client Side and Sever Side together, there are some limitations as well. Though they work together well, you should not messed up with flow of the code by mixing. Here I am providing few useful snippets long with mistakes a first-timer would do.

1. Liquid values can be used in Java Script.

Good thing is we can set alerts and check the values during development.

{% assign isCurrent = true %} 

alert("value of variable is : {{isCurrent}}");

2. Java Script values cannot be passed to Liquid

For example below is NOT WORKING, because we try to use JavaScript value inside Liquide statements.

{% assign Val1 = 100 %} 

var Val2 = 200;

{% if  Val1 > Val2 %} 

  {% assign IsVal1Greater = true %} 

{% endif %}

3. If we cant use Java Script values in Liquid we need to retrieve server side values of the record we are working with. Hence, below script going to help in retrieving ID of the current record.

Actually, poral pages have Session Id as a part of URL which can be obtained to retrieve current record Id which is stored in Advanced Form Session (adx_webformsession) entity. (** Please don't forget to set permission to this entity through Table Permissions entity entry **)

In fact, this is going to be one of the most used scripts. 

   {% assign SessionId = request.params['sessionid'] %}

   {% fetchxml currId %}
   <fetch version="1.0" output-format="xml-platform" mapping="logical">
    <entity name="adx_webformsession">
        <attribute name="adx_primaryrecordid"></attribute>
        <filter type="and">
           <condition attribute="adx_webformsessionid" operator="eq" value="{{ SessionId }}" />
        </filter>
    </entity>
   </fetch>
   {% endfetchxml %}

   {% if currId.results.entities.size == 0 %}
   {% else %}
      {% assign Id = currId.results.entities[0].adx_primaryrecordid %}
   {% endif %}

4. Don't mix Liquid and JavaScript in control flow

In fact, Below is NOT WORKING

  if (X > Y) {

     {% assign myValue = false %}
 
  }

5. Below is the generic way of reading the results of a Fetchxml query which is also going to be used frequently.

   {% fetchxml office %}
    <fetch version="1.0" output-format="xml-platform" mapping="logical" distinct="false" no-lock="false">
      <entity name="so_office">
        <attribute name="so_officenumber"></attribute>
        <filter type="and">
        <condition attribute="so_officeadmin" operator="eq" value="{{ user.id }}"></condition>
        </filter>
      </entity>
    </fetch>
    {% endfetchxml %}
 
    {% if office.results.entities.size == 0 %}
        {% assign officeNumber = 0 %}
    {% else %}
        {% for result in office.results.entities %}
            {% assign officeNumber = result.so_officenumber %}
        {% endfor %}
    {% endif %}

Oct 14, 2022

Refresh Sub Grid once Async operation is completed

This is a recent challenge came on my way. I had to refresh a sub grid of a form after an operation (say a field value change or Save). Challenge is Sub Grid values are being modified asynchronously through a server side logic. In summery, I have to delay the refresh till that happens.

If I elaborate this further, I have a field (i.e. Amount) in the form of Service entity. Once it is updated the server side logic will trigger and synchronously populate a field (i.e. Item Amount) of the child Service Item entity, which is the child record type of the grid.

While we need to run this Java Script on Save. Below is the code in my on Save script and I will explain each of the pieces  come with the functions being called.

var formContext = executionContext.getFormContext();
var dirtyAttributes = CheckDirtyFieldsOnForm(formContext);
if (dirtyAttributes != null && dirtyAttributes.length > 0 
   && dirtyAttributes.includes("new_amount")
   && formContext.getAttribute("new_amount") != null 
   && formContext.getAttribute("new_amount").getValue() > 0) {
	var childId = RetrieveChildRecordToBeUpdate(formContext);
	   if (childId != null) {
		IsServiceItemAmountSet(formContext, childId, 1);
	   }
      }

This is the first function, which identifies all the fields going to be updated. This returns and array where we need to check if Amount field is among them.

function CheckDirtyFieldsOnForm(formContext) {
  var attributes = formContext.data.entity.attributes.get();
  var dirtyAttributes = [];
  if (attributes != null) {
	for (var i in attributes) {
	   if (attributes[i].getIsDirty()) {
		dirtyAttributes.push(attributes[i].getName());
	      }
	   }
	}
  return dirtyAttributes;
}

If it returns Amount field, we know we need to refresh the grid. Lets retrieve the Service Item Id which we are interested in. (Note: even if there are more than one line items, selecting one is enough since we are going to use this item to check if async operation is completed)

function RetrieveChildRecordToBeUpdate(formContext) {
  var gridContext = formContext.getControl("grid_serviceitems");
    if (gridContext == null || gridContext == "undefined")
       return;

	var complGrid = gridContext.getGrid();
	var complRows = complGrid.getRows();
	var rowCount = complRows.getLength();
	if (rowCount == 0) {
			return;
	}
	for (var i = 0; i < rowCount; i++) {
	  var rowEntity = complRows.get(i).getData().getEntity();
        // Can add some logic if you have filter criteria for 
        // select line item
	  return rowEntity._entityId.guid;
	}
	return;
 }

Since we have Service Item Id, now we have to keep on checking by retrieving Service Item details through server calls (i.e. WebApi) if its updated. In our scenario what I need to check is if Item Amount is populated. Once it happen, we can refresh the grid since we know Sync operation is completed and refreshed grid will show the new values.

This is the recursive code that keep on checking if update has taken place.

function IsServiceItemAmountSet(formContext, Id, index) {
   Xrm.WebApi.online.retrieveRecord("new_serviceitem", Id, "?$select=new_itemamount").then(
      function success(result) {
	   if (result.new_lineamount != null && result.new_lineamount > 0) {
		formContext.getControl("grid_serviceitems").refresh();
		return true;
	   }
	   else {
		 return false;
	   }
	 },
	 function (error) { }
   ).then(function (isSuccess) {
	 if (!isSuccess && index < 5) {
	    index++;
	    setTimeout(function () {
		IsChildClaimAmountSet(formContext, Id, index);
	    }, 2000);
       }
   });
}

This function do recursive WebApi calls in 2 second intervals. Anyway, I am using an index to count these calls, since I need to prevent infinite loops in case of failure in service side logic. Hence maximum no of attempts is limited to 5. I assume within 10 seconds Async operation would have been completed.

Sep 23, 2022

Azure AD B2C to handle login for Portal

Recently I realized that Azure AD B2C is already playing a big role in Portal user access. So I jumped into it and wanted to learn fundamentals. I managed configure Azure AD B2C as the method of login, new registrations etc. Here I am documenting the steps.

1. Register the Portal in Azure AD B2C

Though there is a new App registration link, I started with legacy link.


Please find below the configuration details. Reply URL is needed later (i.e. A)

Once save, you will get Application ID (i.e. B)


2. Configure Sign in Policy / Criteria for Identity Provider

Go to User flows to start this and select Sign up and sign in option in resulting window.


Here, it is essential to give Email sign up as the type of method/ Identity Provider


Now we need to set user attributes and claims. There are more combinations to play around, but what I need is to just to use First Name, Surname along with Email to use to match the users, though collecting few more attributes in registration. Hence, below is my setting.


Other important thing is selecting tfp for claim representing user flow.


Now, you are ready to save and Run user flow and save the issuer link. (i.e. C) which is visible once you click the resulting hyperlink.


3. Configure the Portal

Now go to Portal management > Site Settings to enter below entries as the final step of the exercise.

Entry 1: Use Issuer Url


> Entry 2: Use redirect URL


> Entry 3: User Application ID


> Entry 4: Use Name, Surname and Email for mapping. (value: emailaddress1=http://schemas.xmlsoap.org/ws/2005/05/identity/claims/emailaddress,firstname=http://schemas.xmlsoap.org/ws/2005/05/identity/claims/givenname,lastname=http://schemas.xmlsoap.org/ws/2005/05/identity/claims/surname)


> Entry 5 (Optional): If same fields are to be mapped during sign in add this entry. (value: emailaddress1=http://schemas.xmlsoap.org/ws/2005/05/identity/claims/emailaddress,firstname=http://schemas.xmlsoap.org/ws/2005/05/identity/claims/givenname,lastname=http://schemas.xmlsoap.org/ws/2005/05/identity/claims/surname)


> Entry 6: Add this entry to make sure is new Contact registers, it allows to check the Contact entry to map the email


> Entry 7


Now browse to the Portal and click Sign in. You will get new login page from Azure AD B2C! Most importantly its going to handle all the user managements for you.


If you click, you will notice all the other fields we selected in attributes and claim section would appear.

Sep 20, 2022

Calling a Child Flow

When we worked with old school Workflows, we usually use child workflows to keep the logic in one central point if need to be trigger from different situations. I glad to see same approach is possible in modern flows/ Power Automate.

Below are the simple steps to follow;

1. Create the child flow first and make sure it is On.

2. Child Flow should be a Instant type one

3.So it will start with a manual trigger with what ever the parameter we need to pass value for.


4. Importantly, it is needed to end the child flow in style, by passing back the response to parent Flow. It can be just a simple success message.


5. Now we are good to call the child flow. When you do, it presented with Parameters, so easily values can be passed. 


This sounds simple.. but learning fundamentals is not a bad thing.

Sep 16, 2022

Run an Update Plug-ins On Demand

One of the main questions asked in D365/ Dataverse jobs interviews, event today,  is differences of Plug-ins and Workflows. I used to say Plugins cannot be executed on Demand, but workflows. Its not wrong, but there is one indirect way of executing Update plugins on Demand. That's through bulk data updated.

Within the update options of the tool, you will find an option called Touch which really doesn't update the field, but it triggers other business logic bind to that operation.  (How it is done? I don't know!)


Anyway, this is an interesting option. Below are a couple of things to note;

1. This operation doesn't add anything to Audit.

2. One limitation is if there are many custom business logics (More than one Plug-ins, WFs), they all will get executed. No way of selecting what you want.

Sep 2, 2022

Adding CRUD operations to a List in a Portal

Here I am discussing one of the main customizations you may need when developing a Power Apps Portal. That is adding CRUD (Create, Read, Update and Delete) operation on items in a list. 

There are two pre-requisites to proceed with this exercise;

1. A list should have configured already.

2. Below 2 entries should have added to the Site Settings entity that gives permission to nominated entity (in my case so_office) to be accessed through API.


All my JS codes will go in Options tab of the list.


Consider below JS, where I have embedded some extra lines to a standard code of doing something for each item in the list.

Block 1 - Change some fonts styles through CSS

Block 2 - Give different color for the lines where No of Clients are greater than 100

Block 3 - Call CRUD functions by introducing 4 new buttons.

$(document).ready(function (){
$(".entitylist.entity-grid").on("loaded", function () {
$(this).children(".view-grid").find("tr").each(function (){
// do something with each row

// Block 1
$(this).css("font-family","Sans-serif");
$(this).css("font-size","10px");

// Block 2
if ($(this).find('[data-attribute="so_noofclient"]').attr("data-value")) {
    var noOfclients = $(this).find('[data-attribute="so_noofclient"]').attr("data-value");   
    if (noOfclients >100) {
    $(this).css("background-color", "#E49C9C");
    }
    else {
    $(this).css("background-color", "#F6F5F5");
    }
}

// Block 3
   if ($(this).closest('tr').attr("data-id") != null)
   {
     var recId = $(this).closest('tr').attr("data-id");   
     var nameCol = $(this).find('[data-attribute="so_name"]');
         nameCol.append('&nbsp;&nbsp;<input type="button" value="C" onclick="CreateOffice();" style="color:orange; border-style: none;" />');
	 nameCol.append('&nbsp;&nbsp;<input type="button" value="R" onclick="RetrieveOffice(\''+ recId +'\');" style="color:orange; border-style: none;" />');
	 nameCol.append('&nbsp;&nbsp;<input type="button" value="U" onclick="UpdateOffice(\''+ recId +'\');" style="color:orange; border-style: none;" />');
	 nameCol.append('&nbsp;&nbsp;<input type="button" value="D" onclick="DeleteOffice(\''+ recId +'\');" style="color:orange; border-style: none;" />');
   }

});
});
}); 

Above steps resulted below. You may notice four buttons to trigger the operations.


Now we have below four functions those do the respective operations.

function CreateOffice(RecId)
{
    alert("Creating Office..");
    webapi.safeAjax({
        type: "POST",
        url: "/_api/so_offices",
        contentType: "application/json",
        data: JSON.stringify({
        "so_name": "Created Office"
        }),
        success: function (res, status, xhr) {
        console.log("entityID: "+ xhr.getResponseHeader("entityid"));
        document.location.reload(true);
        }
    });
}

function RetrieveOffice(RecId)
{
    alert("Retrieving.." + RecId);
    webapi.safeAjax({
	   type: "GET",
	   //url: "/_api/so_offices?$select=so_type,so_revenue",
           url: "/_api/so_offices("+ RecId +")?$select=so_type,so_revenue", 
		contentType: "application/json",
		success: function (res) {
			console.log(res);
            //alert(res.value[0].so_revenue);
            alert("Type :" + res.so_revenue);
		}
	});
}

function UpdateOffice(RecId)
{
    alert("Updating Office..XX" + RecId);
    webapi.safeAjax({
        type: "PATCH",
        url: "/_api/so_offices("+ RecId +")",
        contentType: "application/json",
        data: JSON.stringify({
        "so_name": "Office Updated"
        }),
        success: function (res) {
        console.log(res);
        document.location.reload(true);
        }
    });
}

function DeleteOffice(RecId)
{
    alert("Deleting Office.." + RecId);
    webapi.safeAjax({
        type: "DELETE",
        url: "/_api/so_offices("+ RecId +")",
        contentType: "application/json",
        success: function (res) {
        console.log(res);
        document.location.reload(true);
        }
    });
}

None of the above will work unless we add below Wrapper AJAX function. So added this as well.

(function(webapi, $){
		function safeAjax(ajaxOptions) {
			var deferredAjax = $.Deferred();
	
			shell.getTokenDeferred().done(function (token) {
				// add headers for AJAX
				if (!ajaxOptions.headers) {
					$.extend(ajaxOptions, {
						headers: {
							"__RequestVerificationToken": token
						}
					}); 
				} else {
					ajaxOptions.headers["__RequestVerificationToken"] = token;
				}
				$.ajax(ajaxOptions)
					.done(function(data, textStatus, jqXHR) {
						validateLoginSession(data, textStatus, jqXHR, deferredAjax.resolve);
					}).fail(deferredAjax.reject); //AJAX
			}).fail(function () {
				deferredAjax.rejectWith(this, arguments); // on token failure pass the token AJAX and args
			});
	
			return deferredAjax.promise();	
		}
		webapi.safeAjax = safeAjax;
	})(window.webapi = window.webapi || {}, jQuery)

Hope this code snippet helps!

Aug 16, 2022

Retrieve instance URL from Custom Workflow Activity

When this requirement arises, I though it should be a matter of reading it from context or so on. Anyway, then I realized it’s not available and no straightforward way of doing it. So I would suggest below two ways to do that based on your circumstance. 

If your system has a separate entity for configuration data, like key value pairs, its best to store there. Advantage is this entry could be accessed from many other areas as needed. Since its store as data, deployments don’t override. 

If you really want to retrieve dynamically, there is one other way.

IWorkflowContext context = ExecutionContext.GetExtension<IWorkflowContext>();
context.OrganizationName

This attribute gives you the unique name of the instance. 

While this is unique to instance, you are able to write a case statement etc. to retrieve the correct URL. This is good because your system will switch dynamically to correct URL but you are keeping URLs in the code itself. This means if you add new environment you need to modify the code and re-deploy the assembly.

Aug 9, 2022

How to track the changes done for a Workflow

There are two parts to the question. If you have written Custom workflow Activities, obviously you have written in Visual Studio (Or similar Dev tool) and may have stored in a repository. In fact, you are all good to track back what changes are made by developers in different occasions. 

Tricky part comes next: How to track down the changes done to a Workflow through the OOB workflow template. That’s adding/ removing different actions such as Create, Update etc. Unfortunately, there is no proper method. 

Anyway, there is a little trick. If Workflow was commissioned to the system for a while (Async or real time), chances are there could be sessions those failed. Failed sessions are always kept associated to the workflow. 

Now if you check an old failed session, you will be able to see all the steps existed in the workflow at that time. This is not a perfect solution, but I managed to explain an issue in one of my projects today by doing this to prove someone has removed an essential step. Unless this method, no one would be able to explain.

Thought of sharing since this could help someone!

Feb 19, 2022

Qualify lead via a Power Automate/ Flow

 This can be done with 4 steps as illustrated below;

1. Retrieve Lead Id from Power App (In my case we trigger this from a Canvas App – you can trigger from many other forms)

2. Obtain the Access Token. (Application needs to have registered in Azure, where you get Application Id and Secrets required for this step)

3. Initialize a Variable with Access Token retrieved in previous step

4. Execute the Qualify Lead through API.

Let’s see details of each step;

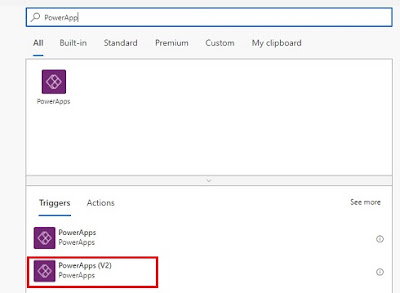
1. Select Power Apps (V2) as the trigger. When opening the new Power Automate, I would skip the wizard so I get much flexibility in selecting my trigger through below window. Then I can add my only Parameter, which is Lead Id.


2. Below is the configuration details pass into Http Request in this step. Please notice some details are from App registration.

3. If you pass the correct details in previous step, it will produce the Access Token, which we read into a variable in this step.

4. Now it’s a matter of executing the Lead Qualify message through API. For this also, we use Http Request. Please notice how we pass the Token and Lead Id. I am only change the state as Lead Qualification, but configuration can be changed to create Contact/Account easily (Check Body). 

Now it’s a matter of calling the Power Automate/ Flow from Power App.

Reference;

https://www.inogic.com/blog/2019/05/qualify-lead-in-dynamics-365-through-the-canvas-app-with-microsoft-flow/